Sunday, January 22, 2023

Love You!!!!


Hello! Well, I finally got the nerve up to try my Spellbinders Glimmer Hot Foil Machine. I bought one, right after Lawn Fawn released their first hot foil plates and the first time I used it, it wouldn't heat up. I contacted Spellbinders and they were absolutely amazing about replacing it. However, one thing led to another, I didn't use it and then was hesitant in trying again.

I decided to foil on Lawn Fawn Pearlescent Vellum using the Woodgrain Background hot foil plate. I used a Crimson Stars Glimmer Hot Foil. It wasn't a solid red, but I figured that the foil lines were so thin that I wouldn't make too much of a difference. Since the vellum is so thin, I added two pieces of cardstock for an additional shim. It turned out amazing. I just wish the pictures could capture the shimmer.

Since it is tricky to adhere vellum to something without the glue showing, I just cut a piece of Ballet Slippers cardstock and folded a 1/4" of the foiled paper to the back of the cardstock and used a strong tape adhesive. Then I layered it on top of the largest Fancy Scalloped Rectangle Stackable cut from Barn Red cardstock.


  In order to cut out the heart frame, I cut the largest heart from the Lacy Heart Stackables from Pink Pastel Shimmer cardstock, and then cut the inside of the heart with the Outside In Stitched Heart Stackables to create the frame.

I cut the LOVE YOU out of Red Holiday Sparkle cardstock and Pixie Dust Sparkle cardstock using the letters from Finley's ABC's. I offset the Red Sparkle cardstock to the right of the Pixie Dust cardstock on each of the letters.

I cut the small hearts from Red Sparkle cardstock using the heart from the Build A Cabin die set.

The little beaver from Wood You Be Mine was just perfect for this card. I used a craft knife to cut around his little arm so I could tuck a little red hear under it.

This was a really quick and fun card to make and I am so pleased with the way the hot foiling came out. I think if I did anything different, I would have used the Red Sparkle paper in place of the Barn Red. Oh well, maybe next time.

Thanks for stopping by!


Sending Valentine Hugs


 This card was actually the inspiration for my Love Shack card. While that one is fun, this one is friendly!

For this card I used Lawn Fawn's Build A Cabin cut from Pink Pastel Shimmer cardstock. All the house trim is cut from Red Holiday Sparkle cardstock. I used Finley's ABC's for the lettering.

I wanted the door to be a different color, so I cut the door out of Pixie Sparkle cardstock and then used the heart die from the Build A Cabin to cut out the door below the window. The extra hearts are from the Heart Garden Border die. I filled in the windows and door opening with some scrap Pearlescent Vellum.

I also though that the "logs" on the cabin needed some definition, so I used a copic R32 and drew along the lines to accomplish it. I also used the marker to color in the bricks on the chimney.

For the background, I hot foiled the new Woodgrain Background Hot Foil Plate with Crimson Stars Glimmer Hot Foil. This is the second card I have used my Spellbinders Glimmer Hot Foil System and I really like this technique and look forward to other plates and doing it more often.

For the sentiments on the outside of the card, I used Long Distance Hugs and Simply Winter Sentiments. For the inside of the card, I stamped the sentiment from Simply Celebrate Hearts.


  Thanks for stopping by and Happy Valentine's Day!

Friday, January 20, 2023

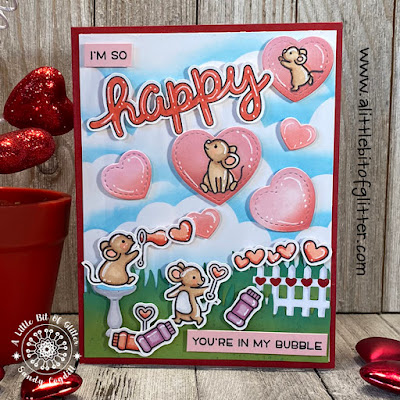
So Happy Your In My Bubble!


Hello Friends! Well those darn little mice caught me again. I just can't stay away from them! They are so versatile. I created this card for the Lawn Fawnatics Challenge Blog #141 - Lots Of Heart. There are some people that I definitely want in my bubble, so I decided to use the Lawn Fawn Bubbles of Joy stamp set. The stamp set has small heart shaped bubble, but I needed some larger ones so I could "float" a couple of mice in them. Once again, I shopped by stash and used, the heart from Build A Cabin for the smallest heart, Reverse Stitched Scalloped Circle Windows for the small heart, Outside In Stitched Heart Stackables, for the medium hearts and Flippin' Awesome for the largest heart. After I cut out my grass using Cilantro cardstock and Grassy Hillside Borders. I used Lucky Clover to add some dimension and texture to the grass.

I used Ranger's Ink Oxide in Festive Berries and Spun Sugar to add color to my hearts. I used Tumbled Glass and the Cloudy Stencil for my sky.

For the hearts that have a little friend in them, I stamped them in the center of the heart, masked them off and then inked over them.

I felt like a needed a little extra to create my scene, so I used Build A House Spring Add On for the fence and birdbath.

For the sentiment, I used Scripty Bubbles.

I used Copic markers in the colors: C0, C1, R20, R24, V01, V05, E33, E31, and E30. I used a white gel pen to add dimension but I am not very good at it. It's going to take a little practice.

Even though this would be a really fun Valentine, I decided to leave the inside blank so that it could be used for other occasions.

Thanks for stopping by and have a wonderful day!


Monday, January 16, 2023

Beep! Beep!


Beep! Beep! Hello friends! I took the rare opportunity to clean up my workspace yesterday and immediately had to work on a card. This one came together really quickly. I just love the little pals zooming to say "Happy Valentine's Day"

I inked the sky with Salty Ocean Distressed Ink using the Cloud Stencil. This has definitely turned into my favorite was to ink my skies.

I used paper from Lawn Fawn's Flower Market Petite Paper Pack for the Stitched Mountain Border. Being inspired by the Create With Us - Wood You Be Mine class, I used the Heart Garden Border with Pesto Spiffy Speckles. I cut the hearts out of Guava and Ballet Slippers cardstock for the hearts.

I have used elements from Scootin By on the last three cards I have created. This is really a little gem. For this card, I stamped the little heart in the middle of the balloons to add a Valentine element to it.

And who couldn't just love the little mouse leading the way???


  The sentiment is from Scootin By and Special Delivery Box Add On. I added just "a little bit of glitter" using the Sparkle Glaze to the balloons and the hearts.

I just love the clean and simple look of the card and I hope you enjoy it also!


Sunday, January 15, 2023

Happy Sparkling Birthday


Hello friends! I finally got the Christmas down and my house back in order. I created this card for the LawnFanwnatics Challenge #140 - Lets Celebrate. I wanted to use the new Heart Garland Backdrop-Landscape, but I wanted to change the hearts out with something else. I thought it would be fun to switch them out with shells and starfish, so I decided to do an under the sea card.

I started with an inked background using Distress Oxide Inks in Peacock Feathers, Mermaid Lagoon, Salvaged Patina, Cracked Pistachio, Salty Ocean, Tea Dye and Vintage Photo. I used the Lawn Fawn Ocean Wave Stencils and Hillside Stencils. This one turned out so pretty, I was almost sad to cover it up.

I cut the Heart Garland Backdrop out of Sugarplum cardstock. I cut the starfish shells from Shadow Box Card Ocean Add On, the seaweed and coral are from Mermaid For You out of Sparkle Cardstock - Spring.

I wasn't quite sure what I wanted for my scene, so I just shopped my stash and took out any set that matched my theme and the size of what I was trying to create. I wound up coloring way more than I needed, but that is okay, I have a head start for the next project.

For the little ocean elements in the scene I used: Mermaid For You, Fintastic Friends, Life is Good, Keep On Swimming. For the party elements, I used: Scootin' By, Elphie Selfie, Toboggan Together, Ho Ho Holidays.

The copic markers I used are as follows:


I kind of went a little crazy with the glitter. As I was putting the shells and starfish over the hearts of the garland, I realized that everything else looked kind of dull. In order to correct that, I cut the seaweed and coral out of green sparkle cardstock and it made the problem even worse. So I dug out my stickles and started to add accents to all the elements to try to tie it together. It was hard to get a good picture that doesn't make the glitter look a little chunky, but from a distance it is really cute! I can't wait to send it to the perfect little girl.

Thanks for stopping by! I hope you have a wonderful day. 


Sunday, January 1, 2023

Have Tree ... We'll Travel


Oh my goodness, what a holly jolly ride! I created this card from Simple Stories - Mix & A-Mingle Collection. When I was shopping the collection, this fun little chipboard van jumped right out at me and I absolutely had to do a card with it as the main focus. I also used the Merry Christmas chipboard pieces from the same collection which made it all the quicker.

This just might be my favorite Christmas card this season!

Thanks for stopping by!

Mix And A-Mingle


Gosh, I don't know about you but sometimes I just need to make a few cards in a hurry. I have found that the best way to do this is to use patterned paper and matching ephemera. For this project, I used Simple Stories Mix And A-Mingle 6 x 8 Paper Pad and Mix And A-Mingle Bits and Pieces.

Once I had the basic sketch of the card figured out, it was so quick and easy to duplicate using the patterned paper and bits and pieces to make three cards. The dimensions of the outer and inner paper is shown in the picture below.


  I mounted the three rectangles on a 4.25" x 5.5" card. I popped up the little decorative elements on foam dots. I always feel like I need to do something on the inside of the card not only to fortify the backside, but to tie the design all together. I cut a piece of cardstock 4.0" x 5.25 and attached a piece of scrap paper at the bottom. I also stamped a very generic sentiment  .


I definitely enjoyed making these especially because I love the retro feel of this paper.

Thanks for stopping by!

Home For Christmas


I added a small cut out to the inside of the card along with a strip of that pretty plaid. I left the inside blank so a heartfelt message can be handwritten inside.

As always, thank you for stopping by!

Once I had embossed the paper, I decided that I didn't want a window in the card but wanted to highlight the sentiment. I liked the "Home For Christmas" sentiment. I played around with what I would like to use for the sentiment background and decided that the black holly paper would be just perfect. I went ahead and glued the three pieces together to beef it up a bit. I cut the holly ephemera in two pieces to put on both sides as the wording. I used foam dots to pop up the sentiment, the cardinal and the little hearts.  

I left the inside of the card blank because I find that most of the time I prefer to handwrite my message in the inside.

Thanks for stopping by. I hope you have a Blessed and Happy New Year.


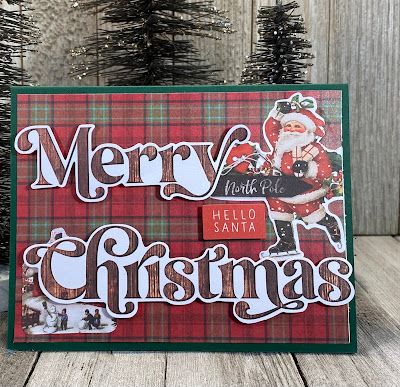
Hello Santa - I Still Believe


Who doesn't like a Christmas Plaid? The plaid paper on this background just might have been my favorite paper out of the 6"x8" Simple Vintage Christmas Lodge Paper Pad by Simple Stories.

I love Santa Clauses, so it was very easy to decide on this guy along with a trimmed tag with so fellas building snowmen. The cut outs I used were from the Simple Vintage Christmas Lodge - Ephemera- Bits and Pieces. The Merry Christmas was the perfect size for a landscape card. I used foam dots to popup the sentiments and the little "Hello Santa" piece.

I added a small cut out to the inside of the card along with a strip of that pretty plaid. I left the inside blank so a heartfelt message can be handwritten inside.

As always, thank you for stopping by!  


Santa Tree or Window Ornament


I am always looking for different ways to use some of my favorite paper prints. I have some bezel sets from Spellbinders and thought that using some paper from Simple Stories Vintage Christmas Lodge would make a fun and different ornament. I use a two part epoxy poured over a little bit of colored micro beads to add dimension.


I hope everyone had a wonderful holiday season! Thanks for stopping by.

The Simple Life


Happy New Year all! I don't usually make new year's resolutions, but this year, I think I am going to start challenging myself to start using all the printed paper I have collected over the years. My "playroom" is about busting with 6" x 6" or 6"x6" pads.

As I was working on these cards, I started thinking about how much time and planning a designer goes through to make a collection that is so versatile. Not only do they have to design the paper and ephemera, they also need to plan on reducing it from a 12" x 12" paper to a smaller size perfect for smaller albums or cards.

I really enjoyed working with this collection from Simple Stories - The Simple Life. These cards were very quick and simple to make. I used cardstock from my stash and a couple of die cuts I had out on my table. I didn't put a sentiment on the inside of the card so it could be used as a notecard.


I think that I may make three more and then tie them together with a pretty ribbon and gift them. What do you think?  

Love Where You're At


Hello and Happy New Year!

I was working on a Christmas Ornament and knew that I would have extra epoxy left so I cut out a few pieces of paper from Simple Stories - The Simple Life and made it them into pendants. These would be great as a casual necklace or even a keychain.


 Life goal - Love Where You're At.