Tuesday, September 26, 2023

Tricks & Treats


Hello! I hope everyone is doing well. Today I just felt like putting on some music and coloring.

This stamp set is a Simon Says Stamp STAMPtember collaboration with Brutus Monroe called Tricks and Treats. I was having such a good time coloring these that I decided to color the cupcake three different ways.


  The Copic colors I used for the cupcake above are: YG21, YG23, YG25, V12, V15, V17, YR63, YR65, R17, BG10, BG11, BG13

The Copic colors used for the cupcake above are: BG10, BG11, BG13, Y13, Y15, Y17, RV04, RV09, RV66, V12, V15, V17

The Copic colors used for the cupcake above are: Y13, Y15, Y17, RV04, Rv09, RV66, B23, B24, B28, YR63, YR65, R17

The outside pattern paper is an older Doodle Bug design called Halloween Parade. I cut both the patterned paper using the My Favorite Things A2 Stitched Rectangle STAX and used the My Favorite Things Stitched Rectangle Scalloped Edge Frames for the black frame. The sentiment is a CZ Design SPOOKY Wafer Die.

I am really happy with the way these turned out. I have a friend make the most amazing baked treats. I think I will send her one of these for Halloween this year.

Thanks for stopping by and I hope you are having a great day!

Sandy


Friday, September 22, 2023

Let's Get Cozy!


Hello friends!! It is officially fall!!! Yay! I have noticed a lot more leaves falling on my morning walks even though they really haven't started turning colors here in the city.

I created this card for the current Lawn Fawnatics Challenge #157 Awesome Autumn. I was hoping to create something with an apple cut out but I had the Outside In Stitched Apple Stackables but I didn't have the Stitched Apple Frames and I really needed both to do what I was thinking about. Darn - back to the drawing board.

I love the new Favorite Flannel Collection. It just looks so cozy. With that in mind, I decided to dress a couple of the Outside In Stitched Maple Leaves in some warm winter accessories. For their accessories, I cut them out using the Woodland Critter Huggers Winter Add On. Her mittens are a smidge too big but that's ok. I cut their little faces from the Gingerbread Friends Die.

The "Let's Get" is from the Better Together stamp set, which I think was a freebie at one time. I used the Henry's ABC's for the "cozy".

I just think this little couple is so sweet and I hope you do also. As always, thank you for stopping by and I hope you have an amazing fall season.

Sandy


Tuesday, September 19, 2023

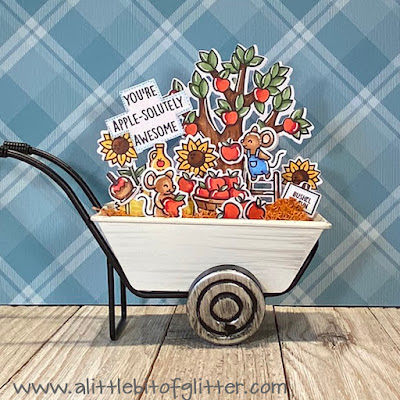
You're Apple-soulutely Awesome


Hello! One of my favorite places to shop is Hobby Lobby. I probably go there at least once a week. They have just the most fun and affordable stuff. I came across these little wheelbarrows in their fall section in early summer. They were still full price, which even at that, I think they were around $6.00. They had them in white painted and a plain galvanized steel color. I bought a couple of each but I wish I had bought more because I never saw them again. They are so stinking cute!

I decided to do something different today. I put a little floral foam in the bottom the the wheelbarrow and then covered it up with some orange colored moss. I used stamped elements from Lawn Fawn's Apple-solutely Awesome, Happy Harvest and Hay There! Hayrides. I glued toothpicks to the back of each little piece and then arranged them in the wheelbarrow. Easy peasy!

The Copic colors I used are:

  • Apple Tree
    • E31, E37, E57, E79
  • Leaves
    • G82, YG63, YG67

  • Ladder
    • E31,E37

  • Bushell Basket
    • E31, E37, E57

  • Apples
    • R14, R27, R46

  • Cider
    • YR21, YR24

  • Mice
    • E31, E33, E35

Thanks for stopping by! Just a few more days until it is officially fall! Hooray!!!! Hope you have a spectacular day!

Sandy


Sunday, September 17, 2023

Spooky Snow Globe


Hello! Still playing with Lawn Fawn's last release. It was a big one so there is a lot to play with. I wanted to use the new Build A Snow Globe, but I didn't want to do a Christmas or Winter theme. I have fairly Disney snow globe collection that includes several Halloween ones and of course they are my favorites. So a Halloween snow globe it is!

On one of the videos from the last release, Chari Moss did a background for the Batty For You stamp set using colored cardstock, distress oxide and the cloudy stencil. This is my new favorite background. It is really simple and packs a big punch. For this card, I did the same technique using Peacock Cardstock and Peacock Feathers Distress Oxide. I speckled it with black water color. Once it was dry, I used the Starry Sky Background Hot Foil Plate with Purple Glimmer Hot Foil.

I used the new Shadow Box Card Halloween Add On for the inside of the snow globe. I inked the background of the globe with Squeezed Lemonade, Carved Pumpkin and Seedless Preserves. I just used scrap paper for the haunted house, gate and grass. the bats were stamped on the sky. I used the wings from the Tiny Gift Box Bat Add On for the wings on the snow globe. The bat on the snow globe is from the Scalloped Treat Box Haunted House. You could use the bat from the Shadow Box Card Halloween Add On, it's just a little bit smaller.

The sentiment is from Simply Fall Sentiments. I was heat embossed on Fake Tan Cardstock.

I think I will send this card to one of my boys or to one of my friends that aren't as into Halloween as I am.

Thanks for stopping by and I hope that you have a great day!

Sandy


Saturday, September 16, 2023

Wishing You Joy!


Hello! My husband and I have had a dog for almost our entire time together. The only other pet we have had was a little budgie parakeet but that is a story for another time. Needless to say we are dog people for sure.

I was lucky to get this Lawn Fawn and Simon Says Stamp collaboration. It sold out so fast. I just happened to be on my computer when it dropped and luckily I was able to snag one. I have definitely missed out before.

I inked the background with Blueprint Sketch and Salty Ocean Distress Oxide Ink, then I spritzed it with a little bit of water. Once it was dry, I used the Snowflake Background Hot Foil Plate with Silver Glimmer Foil to add the snowflakes.

I cut the Stitched Hillside Backdrop: Landscape out of Pixie Dust Cardstock. I used the Winter Tiny Tags for the ornaments with letters cut from Oliver's ABC's for the lettering.

I used Copic markers to color the images from Home For the Howlidays and Sledding By. Both of those sets are from Simon Says StampTEMBER. The two little fella's in the corners are my favorites.


The Copic colors that I used are:

Y02, Y17. B23, B29,R14,R24,R46, YG05, YG09, E31,E34,E35, E37,E37,E39,E71,E74,C0, C1, C2,C3,C4,C7

I left the word "Joy" as the sentiment. I had wanted to add "Sending You" or "Wishing You" to the upper left corner, but nothing looked right so I added a few snowflakes cut from Pixie Dust Cardstock. The snowflakes were cut from the Magic Iris Snow Globe Add On.

I think our Quincy will be sending this to Dr. Shannon for Christmas. She and her staff takes such good care of him.

Thanks for stopping by and I hope you have an amazing day.

Sandy


Tuesday, September 12, 2023

Three Little Pumpkins


Hi there!

Just a quick one for today!

When my boys were little they learned a song about three little pumpkins sitting on a fence at school. I guess a witch comes along and snatches them up to make a pumpkin pie. I sure miss those days.

For this card, I used the new Harvest Crate to create the fence. You can't really tell by the picture but the center of the fence is popped up on foam tape to give it dimension. I cut it from Light Brown Woodgrain Cardstock. I touched them up a little with Vintage Photo Distress Oxide Ink. I cut the Stitched Pumpkins from Canned Pumpkin Cardstock. I used a Copic marked to highlight the stitching. I turned the pumpkins into Jack O Lanterns by drawing faces on them.

For the background, I used the Nighttime Sky Stencil for the moon. I used Squeezed Lemonade for the moon, touching up the edges with Spiced Marmalade Distress Oxide Ink.

From the moon out, I blended Tumbled Glass, Blueprint Sketch and Chipped Sapphire Distress Oxide Ink. Once everything was dry, I masked off the moon and applied Silver Glimmer Hot Foil using the Starry Sky Background Hot Foil Plate.

I used the Grassy Hillside Border Die to cut out the grass from Noble Fir Cardstock. I touched the edges with Rustic Wilderness Distress Oxide Ink. I spritzed with Tim Holtz's Distress Wicked Elixir Mica Stain.

The sentiment is from Simply Fall Sentiments.

There isn't a whole lot to this card but I like its simplicity.

Thanks for stopping by! Have an amazing day!

Sandy

Monday, September 11, 2023

Meet Me Under The Mistletoe


Hello!

I am still playing with Lawn Fawn's Fall and Winter New Release. I was really excited when they announced that they were releasing a Christmas Before and Afters stamp set. One of my favorite interactive dies is the Magic Picture Changer. I think I have used that one the most.

The mice are my favorite Lawn Fawn characters to color and use in cards and these two are no exception.


I wanted to make sure the mice were the stars of the show so I didn't want to add any other little elements. I did however, want to use some of my older patterned paper and I thought that the Perfectly Plaid Christmas Paper was just perfect. I used the Fancy Scalloped Rectangle Stackables for the background. To trim out the picture changer, I decided to use the largest of the Stitched Ornaments Die and then trimmed it out with the second largest of the Stitched Scalloped Rectangle Frames Die. If you are going to try this, just make sure you are really careful when you glue the ornament to the picture changer that you don't get glue on the mechanism. I did on the first card I made and I glued the picture in place.

I used the sentiment that came with the stamp set for the front of the card. For the inside, I used the Offset Sayings - Christmas to tie the theme together.

This turned out to be such a sweet little card. I just love it.

As always, thanks for stopping by and I hope you have a great day!

Sandy


Sunday, September 10, 2023

Seasons Tweetings


Hello! I hope this post finds you well. We had a little excitement a couple days ago. I live in the suburbs close to a great trail that runs along a creek. Earlier this summer, Quincy, our derpy dog, and I ran into a coyote one morning. Coyotes are always in the area and unfortunately or fortunately, they take care of the rabbit population. We can hear them yipping at night but don't usually see them during the day. Anyway, my husband was walking Quincy the other day and a neighbor told him that there was a bobcat up ahead. What the heck?

I thought I would take another shot at the current Lawn Fawnatics Challenge #156 - Color Challenge. These are just so dang hard for me.

I used the new stamp sets Winter Birds and Winter Birds Add On.

I used the white paper from the Spiffier Speckles Paper and used the Winter Wonderland Window die to cut the window opening. I cut the inside window portion of the die out of gold glitter paper and then I cut off all the snowflake pieces so all I had left was the gold frame. Then, I cut it out again using a silver paper and then colored in the snowflakes using the markers I used to color the birds and other pieces.

It is hard to tell from the picture, but I popped up the entire window piece with foam to give the card a little dimension. The tree branches and the birdhouse is glued directly to the background. Everything else on the inside is popped up with foam dots so it is very dimensional also.

I used the sentiments from the stamp set and heat embossed it with gold embossing powder.

I am pretty happy with the way this card turned out. It definitely doesn't have any traditional Christmas colors in it.

Thanks for stopping by and I hope you have a great day!!

Sandy


Tuesday, September 5, 2023

I Am So Grateful


Hello. This definitely has been a fun and productive weekend making cards. It is also kind of a special day for me. I started this blog one year ago on the 5th of September. So almost 90 cards later, I am still plugging along.

I made this card for the current Lawn Fawnatics Challenge #156- Color Inspiration. I always have such a hard time with those. I don't know why that is but I just do.

I kept this card very simple. There is no Copic coloring at all. The coloring in the leaves is done with distress oxide ink applied with a bristle brush. I like the look of vellum over an inked background so I thought I would heat emboss the sentiments along with the leaves with metallic gold embossing powder. You can't really tell from the picture, but I popped up the vellum piece with foam tape and then covered it with a frame cut from the new Spiffier Speckles Collection.

The Distress Oxide Ink Colors I used are: Bundled Sage, Mowed Lawn, Picked Raspberry, Seedless Preserves and Mustard Seed.

The stamp sets that I used are: Scripty Autumn Sentiments, You Autumn Know, and Let's Go Nuts.

This was a fairly easy and quick card to make. I hope you like it.

Thank you so much for subscribing to my blog and commenting. I really appreciate you. I hope you have a great day.

Sandy

Monday, September 4, 2023

Happy Haunting


 Hello! Hello! I have totally enjoyed this Labor Day weekend. I have had all kinds of time to play with the new items from the Fall and Winter release from Lawn Fawn.

I just love the Spooky Forest Backdrop. It has just about everything you need for a spooky card.

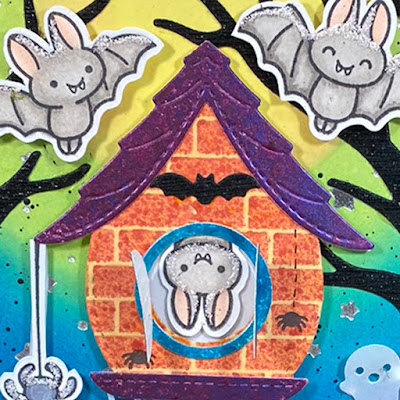
For the background of this card, I used the Nightime Sky Stencil for the moon portion. I inked the moon with Squeezed Lemonade. Blending from the moon out, I used Twisted Citron, Peacock Feathers and Villainous Potion. After the Distress Oxide Inks were dry, I masked off the moon, and applied Silver Glimmer Hot Foil with the Starry Sky Background Hot Foil Plates .

I recently discovered Tim Holtz's Distress Mica Stain. I love this stuff. I bought most of his Halloween collection because, well, it's Halloween and then grabbed a few of the Christmas colors that I thought I might use. I love the bright metallic colors and the speckled effect. It is just amazing. For the roof, base and pole, I just spritzed Hocus Pocus and Fortune Teller on white cardstock and then cut those pieces out. For the tombstones, I used Empty Tomb and Iron Gate. The rocks are Fallen Acorn . The grass is Bubbling Cauldron and Wicked Elixir.

For the brick on the Build A Birdhouse, I used the Brick Stencil with Dried Marigold and Carved Pumpkin Distress Oxide. Then I spritzed Jack-O-Lantern Distress Mica Stain over it.

I cut the spider web and the small bats on the tombstones and the birdhouse from the Build A House Halloween Add On. The ghost and the spiderweb were cut from vellum and the bats were cut from black glitter cardstock.

The bats are from Fangtastic Friends. The sentiment is from Booyah.

I think this just might be my favorite Halloween card.

I hope you enjoyed it and may found some inspiration. Thank you for stopping by and have a great day!!!

Sandy


Hey There! Hayrides!


I took our derpy doodle Quincy for a walk this morning and it was actually cool enough to need a hoody. I notice that the leaves were just starting to change so fall is coming.

Since I had ordered the new Favorite Flannel Collection and the 12" x 12" paper is double sided, it seemed like the Shutter Card would be the perfect match. All the colors are so yummy, it was hard to choose one. I went with the lightest blue so I could create a farmyard scene.

I used the Grassy Stencil with Mowed Lawn and Luck Clover Distress Oxide Ink for the grass at the bottom. I have tried using cardstock cut out with the grass die and it just causes problems with the folding of the side panels.

I think the Hay There, Hayrides is such a cute stamp set. The chicken that drives the tractor just cracks me up. The little wagons wouldn't fit on the side panels, neither would the tractor. I made the tractor the star of the show and then used the other elements of the stamp set to finish setting the scene. That is one of the things I like about Lawn Fawn, they give you enough items in a set to create a fun scene without have to have multiple sets. I even used the wording from the set for the sentiment.

I cut some Simple Puffy Cloud Frames from Speckled Eggshell cardstock.

I always keep the front of my Shutter Cards simple so that when the recipient opens them, they are surprised .

This was a pretty quick card to make.

Thanks for stopping by. I hope you are having an amazing day!

Sandy


Sunday, September 3, 2023

Fall Maple Leaf


Hello and happy September. I would like to think that we are starting to feel fall weather but unfortunately, we still have a number of 90 degree days forecasted.

I just had a little bit of time to play with paper so I decided to play around with the new Lawn Fawn Outside In Stitched Maple Leaf and Stitched Maple Leaf Frame Dies.

I really enjoy the hot foil effect, so I used the Woodgrain Background Hot Foil Plate with Copper Glimmer Hot Foil on Rainforest cardstock. The maple leaf frame is cut from copper glitter paper. For the leaf, which is also the the background, is Canned Pumpkin cardstock. I spritzed the paper with different colors of Tim Holtz Distress Mica Stain.

For the sentiment, I used the Big Script Words Hot Foil Plate with Canned Pumpkin cardstock and Copper Glimmer Hot Foil.

I felt like the card needed a little more pizazz, so I tied some jute with a metallic thread running through it on. I added some leaves that I had left over from another card I made a few weeks ago. Those leaves are cut with the Small Stitched Leaves Die.

And that is that! Supe quick and easy card to make. I was thinking that it would be nice to make maybe six or so in complementary colors and give them as a gift tied up with a pretty ribbon. Maybe a nice housewarming or hostess gift?

Thanks for stopping by. Have a spectacular day!

Sandy


Heading To The North Pole


Hello friends! I could hardly wait to make this card when I saw the tractor during Lawn Fawn's Fall and Winter release. While I do love the farm or harvest theme, I thought putting Santa behind the wheel would just be plain fun.

For this card, I used a few different stamp sets: Hay There, Hayrides, Tiny Gingerbreads, Tiny Christmas, Penguin Party and Merry Mice. and Snow Bunnies (STAMPtember).

I had to do some creative masking for the little wagons, but I like the way they turned out. I definitely didn't have any space to spare getting two wagons and the tractor in.


  I cut two layers of hills from white shimmer paper. I popped up the front layer with foam tape to add dimension and adjusted the little elements as needed. I found that the ground looked a little bare but I didn't really want to add anything as far as colored pieces, so I used the sand pieces from the Build A House Beach Add On to add little snow drifts. I added stickles and a few little hearts to the sky cut out of silver glitter paper to the sky.

The sentiment was stamped and heat embossed from Merry Messages.

This was such a fun little card to make. I hope you found some inspiration.

Thanks for stopping by. I hope you have an great day!

Sandy