Friday, October 27, 2023

Meet Me Under The Mistletoe


Hello! We are finally getting some more seasonal weather here in Colorado. We have had days still in the 80's which is totally unusual for October. They are forecasting snow starting tomorrow evening through the night. How many inches is anyone's guess which is not unusual for us in the city - it just depends of the jet stream. Anyway, I am a little bit excited.

For this card, I wanted to use Lawn Fawn's new Merry Mistletoe die. I used scrap cardstock in three different colors of green and then used some scrap white glitter cardstock for the berries. I love the litte beavers from So Dam Much, so I put them on the trunk from Wood You Be Mine.

I used Copic markers to color in my little friends in the following colors:

E30, E31, E33, E34, E35, E37


The sentiment is from the Christmas Before and Afters. I used the Stitched Hillside Border Die to cut out a couple of snow drifts from Pixie Dust Sparkle Cardstock. Once I placed the sentiment, I quickly realized that I needed something else to jazz up the snow. I used the pine sprigs and pinecones from the Build A Birdhouse Christmas Add On.

I cut the snowflakes from the Magic Iris Snow Globe Add On and the word "hugs" using the Scripty Hugs die. I used the yummy Favorite Flannel Petite Paper Pack for the background.


This was a fun and fairly quick card to make.

Thanks for stopping by. I hope you have a wonderful weekend.

Sandy


Wednesday, October 25, 2023

Warm Winter Wishes


Hello! I am still enjoying my week of dog sitting and card making. It has been pretty darn productive if I do say so myself.

This is the first slimline card I have made. I have tried to stay away from them because I just don't need to buy new borders or stencils but I can see where the additional length does come in handy. I couldn't make this card work on an A2 card without the additional height so I guess I might have to re-think them.

For the wreath, I used the new Magic Iris Holly Wreath Add On. I used scrap green cardstock in two different colors along with some scrap red paper for the poinsettia and berries. The sentiment is heat embossed with metallic gold embossing powder using a stamp from the Magic Holiday Messages. I used the circle die from the Shutter Card die to cut out the sentiment and the Shutter Card Snow Globe Add On for the gold frame around the sentiment.


  The cabin was cut from Light Brown Woodgrain Cardstock using the Build a Cabin die. The string of lights is from the Build a House Christmas Add On , For the snow drifts on the roof and ground, I used the snow from the new Build a Birdhouse Christmas Add On. I cut the snow pieces that are meant to be for the bird house roof and trimmed them to fit the cabin roof, chimney top and foreground of the cabin. The snowflakes are from the Magic Iris Snow Globe Add On.

I am absolutely thrilled with the way this card turned out. I think the cabin looks to cozy. How about you?

Thanks for stopping by. I appreciate you taking time out of your day. Hope you have a good one.

Sandy


Tuesday, October 24, 2023

Be Merry


Hello! I hope you are doing well. I have an extra dog to watcg this week and he is one that I wouldn't dare leave unattended so I have had some extra time to work on cards. I thought that maybe it would be a good time to start on Christmas cards.

I didn't want to do traditional colors for this card. My absolute favorite Christmas style is more a 1950's Kitschy look. You know the plump Santa with the really rosy cheeks, aluminum Christmas trees, Shiny Bright ornaments and color wheels. I just love that stuff.

I hadn't made a card with Lawn Fawn's Reveal Wheel in a long time, so I thought that I would use that along with the Car Critters and the Car Critters Christmas Add On and the Reveal Wheel Car Critters Add On. I used the On The Road die along with Pixie Dust and Silver Sparkle cardstock for the road. I used the new Sparkle Garland Border at the top of the card. I used pink and gray shimmer cardstock for the stars and the little baubles on the garland. I used the same paper for the sentiment, using the Scripty Be and Scripty Merry dies.

I just love the Car Critter die. I have used it in a number of dies. I think it was really cute with the little reindeer antlers and the Rudolph nose.

Thanks for stopping by. Hope you are having a wonderful day.

Sandy

Monday, October 23, 2023

Have A Sweet Halloween


 Hello friends! Well .... we are in the final full week of October and that makes me a little sad. I just love it so much. This may be the last Halloween card I will make but I won't make any promises. I did this one for the Lawn Fawn Challenge Blog #159 Monochromatic. I was inspired by a Halloween card I received last year that was a gingerbread house that was decorated for Halloween and I just loved it. I have had it pinned to my bulletin board by my computer all year waiting for this challenge.

For the background on this card, I used a sheet of white Spiffier Speckles. I inked it with Spiced Marmalade Distress Oxide using the Cloudy Stencil along with the Nighttime Sky Stencil. I used the moon part of the Nighttime Sky Stencil for the moon. I found that it blended too well with the clouds, so I used my Copic markers to shade it and give it a little definition so it stood out from the other clouds. With gold speckles that are already on the paper, I didn't have to do any more speckling with ink. I stamped the bats from the retired Happy Haunting stamp set with the distress oxide also.

For the Spooky Forest Backdrop, I inked white cardstock with the Spiced Marigold Distress Ink and then cut it out. I did a little highlighting with Copics to add a little definition to the tree branches and trunks. For the grass, ghosts and gravestones, I cut them from white cardstock and then colored them with Copic markers.

The stamp sets that I used are: Sweet Christmas, Tiny Halloween, Costume Party and Simply Fall Sentiments.

All the coloring was done with Copic markers in the following colors:

YR18, YR20, YR21, YR23, YR24, YR27, YR30, YR31

This challenge was a real challenge for me because I really wanted to drag in some yellows and definitely black. I actually had to put the markers I was using on my table and move the rest of them waaaay out of the way. I am really happy with the way it turned out though.

Thanks for stopping by today. I hope you have a sweet Halloween.

Sandy


Tuesday, October 17, 2023

Winter Birdhouse


Hello! I was going through my printed paper this afternoon and came across this petite paper pack and fell in love with it again. It is called Perfectly Plaid Winter and it is from a few years ago. I had a little bit of time, so I just threw this together.

I used the new Build A Birdhouse, Scripty Hello and the Reversed Stitched Scalloped Rectangle Windows.

I think it will be a cute little notecard or thank you note. It might be fun to make a set of them mixing up the plaids and giving them as a gift.

Super quick post today. Thanks for stopping by. Hope you have a great day.

Sandy

Monday, October 16, 2023

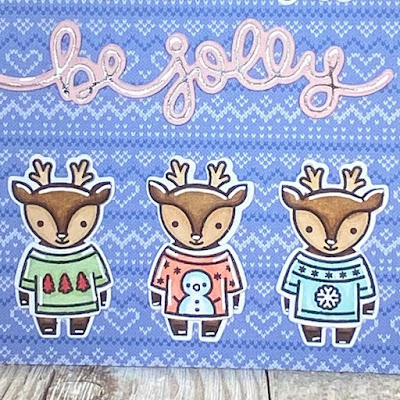
Ugly & Bright


Hello friends! The Christmas season is just around the corner and I for one just love the holiday sweaters and jewelry for family dinners. The gaudier the better. It is such a fun time.

For this card, I used Lawn Fawn's Ugly and Bright stamp set for the larger deer and the Simply Celebrate Winter Critters for the little guys at the top. The speech bubble sentiments are from the Simply Celebrate Winter Critters Add On and the Simply Celebrate Santa which was a gift with purchase from the Fall and Winter release.

I am still making an effort to use the stacks of patterned paper that has accumulated over the years. This card has the current Spiffier Speckles and a previous collection called Knit Pickey Winter.  

The coloring was done with Copic markers using the following colors:

  • E53, E55, E57, E59
  • R05, R37, R21, R22
  • BG10, BG11
  • G40, G43

The sentiment is from Winter Big Scripty Words. I used the Hot Foil Plate with Silver Glimmer Foil and then used the die to cut it out.

I used a sentiment from the stamp set for the inside of the card along with a scrap from the patterned paper to tie the card together.

This was a fun little card to make. The little sweaters make me smile.

Thank you for stopping by. I hope that you are enjoying the autumn season and are having a great day.

Sandy


Sunday, October 8, 2023

Let It Snow


Hello! Just a quick post for today. I decided to enter another card in Lawn Fawnatics current challange #158 - Make The Sentiment The Star.

I had never done a square card, so I decided that I would give it a try. I also wanted to play around with my Altanew Stampwheel. I think that there is going to be a little bit of a learning curve to stamping in a circle with it. I stamped and embossed snowflakes in a circle but they are hard to see with the sentiment on the card. I went ahead and did the ink blending on the Stampwheel since the paper was on there and that worked very well. I don't think that I would use it all the time for that though. I usually use a glass surface for blending and clean it up with isopropyl alcohol and a cotton towel.

The background paper is blended with Milled Lavender, Dusty Concord and Seedless Preserves Distress Oxide Ink.

I used the snowflakes from the Magic Holiday Messages stamp set. I embossed them with Holographic embossing powder.

The foiled sentiment: let it snow is silver glimmer hot foil. I used the 3" circle from the Large Stitched Circle Stackables to cut out the sentiment and then inked the circle with Milled Lavender Distress Ink. I cut the 3" circle frame from the Stitched Circle Frames out of Pixie Dust Sparkle cardstock.

Still using the Pixie Dust Sparkle Cardstock, I cut the two largest snowflakes from the Winter Wonderland Window die. I cut 9 of each one. The snowflakes felt a little flimsy on their own, so I cut additional snowflakes out of while cardstock and glued another layer to each one to beef them up. I glued them around the circle to form a snowflake wreath around the sentiment.

I am very happy with the way this card turned out and I think it would be very pretty using blues or light greens.

Thanks for stopping by. I hope you are in enjoying your day wherever you are!

Sandy


Friday, October 6, 2023

Thanks For Being My Paw-rent!


Hello! My goodness it has been awhile since I have posted a card. Things here have been a little bit crazy so getting down to my craft room has been just impossible.

Colorado is a very animal friendly State. We take in tons of dogs and cats from shelters from the surrounding states. We got Ozzy, an Australian Shephard, from a high kill shelter in New Mexico, Tucker, a Border Collie/Great Pyrenees Mix from a high kill shelter in Oklahoma and Quincy from a rescue that rescues pregnant dogs from Texas and then adopts out the puppies and the momma's. Ozzy and Tucker have crossed the Rainbow Bridge but Quincy just celebrated his 2nd birthday on the 4th.

I created this card for the current Lawn Fawnatics Challenge #158 - Make the Sentiment the Star. I used Henry's ABC's to cut the letters out of Noble Fir and Blue Jay cardstock. The "thanks for being my" is from Critters At The Dog Park. For the dog and the dog house, I used the stamp set, Yappy Birthday.

I used the following Copic markers to color the pieces:

  • DOG HOUSE: B95, B97, B99, C5,C6,C7,E07, E08, E09,E55, E57, E59, Y21, Y23
  • DOG: E31, E33, E35

For the fence, I used the Scalloped Treat Box: Beach Add On and cut a few fence pieces from Light Brown Woodgrain Cardstock.

I love the plaids in the new Favorite Flannel Collection so I used the green and the beige plaids from the Petite Paper Pack.

For the inside I used a piece of Vanilla Malt cardstock and stamped "I ruff you" from the Critters At the Dog Park set.  

I am pretty happy with the way this card turned out. It was quick and fun to make. Thanks for stopping by today. I hope you have an amazing day and that you are enjoying the fall.

Sandy