Monday, April 29, 2024

How's It Growin?


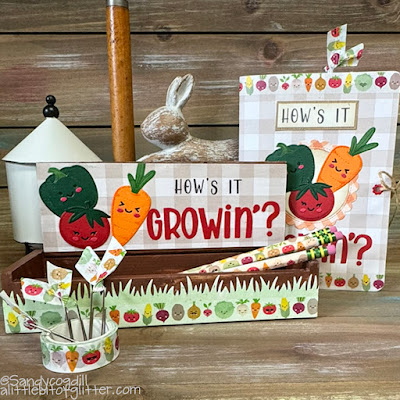
Hello friends! I took a little break from cardmaking this weekend and put on my "crafting" hat. I was inspired by the current Lawn Fawn Blog Challenge. This was an unusual challenge because we got to choose the card we made based on a Bingo card.


I was intrigued by the row under the "B", but couldn't figure out how I could incorporate grass and washi tape.

I went to Pinterest and looked up washi tape and saw that someone had covered pencils with it, so I thought that I would make a pencil holder. I figured that I could put grass cut from green Spiffy Speckles patterned paper at the bottom of the cup and then use the Stitched Garden Veggies and the Stitched Root Veggies to decorate. I couldn't find a suitable pencil cup at Hobby Lobby, but I was able to find an unfinished pencil holder so that is what I decided to use. Well...then I got to thinking....what about making a stationery set? So that is what I did. I hope it is whimsical enough!


I have posted a two part video on my YouTube channel with all of the details. I will put the link at the bottom of this post. It is easier for me to do that because it would be an incredibly long post. I hope you don't mind.

Thanks for stopping by!

Sandy

YouTube Video - Part 2

You Tube Video - Part 1

Sunday, April 28, 2024

I'd Pick You!


Hello again! I am still playing with the new Garden Mouse stamp collection from Lawn Fawn. This is a collection that was only available at brick and mortar stores, so you won't be able to purchase it online.

I previously made a card very similar to this one with their Magic Color Slider die, but I wanted to make one with their Magic Picture Changer along with the Magic Picture Changer Add On. It is one of my favorite interactive dies. It is magic!!!  


The background is cut with the largest rectangle from the Large Stitched Rectangle Stackables. The paper is from an older collection called Dandy Day. I added a white cardstock accent using the Stitched Scalloped Rectangle Frame. The yellow paper on the picture changer is from the new Rainbow Ever After Petite Paper Pack.

The other stamp sets that I used are All The Clouds for the sun and Veggie Happy for the wheelbarrow.

All the coloring was done with Copic markers in the following colors:

  • Sky - B000
  • Grass - YG23, YG25
  • Yellows - Y04, Y08, Y19
  • Oranges - YR02, YR14
  • Pinks - R20, R22, R81, R83
  • Violets - BV00, BV02
  • Blues - BG000, BG02
  • Mouse - E50, E51, E53
  • Grays - C0, C1, C2, C3, C4

I have attached the video at the bottom of this post to show the assembly of the Magic Picture Changer to help you put it together.

Thanks for stopping by and I hope you have an amazing day!

Sandy

You Tube Video

Wednesday, April 24, 2024

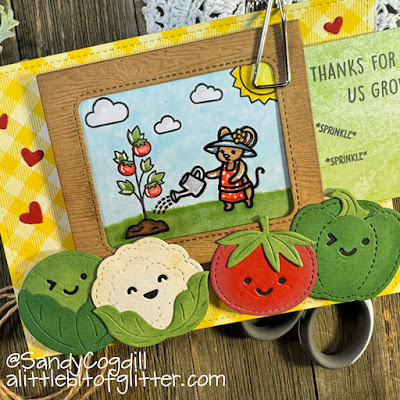
Thank You For Helping Us Grow!


Hello friends! I hope everyone is doing well. Things are crazy here in Colorado, we go from 80 degree weather one day to snow the next but that is Colorado in the Spring.

I was so excited to see that Lawn Fawn came out with another stamp collection that coordinated so well with Veggie Happy called Garden Mouse. However, it was only available at actual local brick and mortar stores. You would think that we would have a Scrapbook store somewhere in the Denver Metro area, but the closest one to me was ninety miles away in Colorado Springs. Luckily, Simple Pleasures Rubber Stamps and Such held a set for me until I could make it out there. So a shout out to Simple Pleasures!!!! I will definitely be back.

I decided to go way back in my stash to an interactive set that I hadn't used in years - the Magic Color Slider. The last time I used this die, I made around eight Christmas cards with the Frosty Fairy Friends.

I cut the main piece of the mechanism out of Light Brown Woodgrain Cardstock. As I usually do, I added a little Distress Ink Oxide to the edges in Vintage Photo. Once I adhered the acetate to the inside of the framed opening, I stamped the sweet little mouse, the watering can and the small mound of dirt using StazOn ink. StazOn is the only ink that will stick to acetate, however, it will permanently stain your stamps, so that is a draw back to using this die set.

For the piece of paper that is revealed when the slider is pulled away, I stamped the same mouse, watering can and mound of dirt but added a sun and clouds from All The Clouds stamp collection and the plant from the Veggie Happy stamp collection.

I colored in the stamped images using Copic markers in the following colors:

  • Pinks: R20, R22
  • Reds: R11, R17, R29
  • Greens: YG17, G82
  • Blues: B000, B91, B97
  • Browns: E31, E33, E37, E57, E59
  • Yellows: Y04, Y08, Y18
  • Grays: C01, C02, C03

I cut the green slider piece from Water Color Wishes Petite Paper Pack. The sentiment is from the Garden Mouse stamp collection. I really like the different variations available for the sentiments. I knew that if I chose the word "grow", I could used veggies or flowers but If I chose "bloom", I would really need to stick to flowers. I also used the word "us" so that it would be a great end of year teacher's card or Mother's Day card if it was given from multiple children.  


I added some Stitched Garden Veggies to the bottom of the card because I felt like they tied in the whole "us" and gardening theme. I popped those up along with the Magic Color Slider with foam tape.

I punched a small hole in the pull tab and added a piece of jute to add a little extra texture and a fun element to the card.

I have attached my YouTube video to the bottom of this post for a more detailed description of the assembly of this card.

Thank you for stopping by and I hope you have a fantastic day!

Sandy

You Tube Video

Monday, April 15, 2024

Rootin' For You!


Hello friends. Today I have a card featuring the new Stitched Root Veggies dies from Lawn Fawn. Now I have to admit, I am not a huge fan of root veggies but I am a big fan of these dies. A friend of mine called me while I was making these cards and I was telling her that I was making a shaker card but I couldn't figure out what to use for the little shaker pieces because I didn't want to use anything sparkly. The more we talked the more she helped me come to the idea of using cardstock. She had even suggested worms, which I had in the Veggie Happy set, but they were just a smidge too large. Too bad because they would have looked so darn cute as shaker pieces. For the "dirt", I used Ground Coffee cardstock. To make the little hearts, I used the Polka Heart Backdrop:Landscape. I just used the larger heart pieces because I felt like the smaller ones were too small to make an impact.


When I make more intricate shaker cards, I like to cut multiple layers of cardstock to create the shaker "wells" as opposed to using foam tape. I think it makes a cleaner card. For this card, I laid my dies out and taped them down where I want them to cut out on the the front of the card. I will keep them taped down and then as a sort of template to cut out another four layers of white cardstock. Once I have those cut out, I will glue the layers together on top of each other to create my wells.  


I cut the carrot out of Fake Tan cardstock and touched up the edges with Crackling Campfire Distress Oxide Ink. The turnip and beet are cut from Vanilla Malt cardstock. For the turnip, I used Tattered Rose and Victorian Velvet Distress Oxide Ink. The beet is Victorian Velvet and Villianous Potion Distress Oxide Ink.

I cut out the little eyes and mouths with the dies that came with the set. I decided that I would just color in the cardstock behind those openings so I didn't have anything extra that the shaker pieces might get held up on. I glued in the the veggies and then I took a marker and went around the outside and inside edges with a matching color to cover up the white of the cardstock so it is a nice clean shaker well.  


I filled the little veggies with some of the hearts that I cut from the Ground Coffee cardstock. I don't put a lot in each one because I don't want to take away from the fact that they are little vegetables. I will adhere a piece for acetate cut to 4" by 5.25" to the front using liquid glue.

I have a piece of green gingham from the Fruit Salad Petite Paper Pack. I have used the largest of the Large Stitched Rectangle Stackable. I will layer the the gingham with the brown cardstock that I have cut the veggies out of together. I taped the Stitched Simple Wavy Border where I wanted the gingham paper to stop and the "ground" to start. By cutting them at the same time, I was assured that they would align perfectly.

I touched up the edges of the gingham paper edges with just a little Mowed Lawn Distress Oxide Ink. For the ground, I used Walnut Stain Distress Oxide Ink on the edges and speckled it with a little watered down ink. I glued these two pieces to the top of the shaker piece.

I cut the word "Rootin" using Oliver's Stitched ABC's out of Barn Red cardstock. I used the Harvest Crate die to cut out the signs using Speckled Egg and Light Brown Woodgrain cardstock. I used Riley's ABC's for the lettering. I cut the greens for the veggies from Algae cardstock and touched it up with a little Rustic Wilderness Distress Oxide Ink.

The little mice are from the Veggie Happy stamp collection.

Once I have everything where I like it, I will glue it down with liquid glue.

I think this is such a cute card and I can't wait to send it to someone who needs a little bit of encouragement.

I hope you are doing well. Thank you for stopping by today!

Sandy

You Tube Video
Saturday, April 13, 2024

Happy Mother's Day!


Hello and happy Sunday! My goodness, April is just about half way gone and it's just about time to think about planting flowers. I don't have in ground flower beds but I do have planters and I really enjoy those.

I thought I would make a Mother's Day card with the new Lily of the Valley and the Watering Can dies from Lawn Fawn. I cut all of the pieces from the Watercolors Wishes Petite Paper Pack.

The sentiment on the front of the card I used the Happy Happy Happy stamp set. For the inside of the card, I used Henry's Build A Sentiment: Spring. Again, I can't express how much I love this new stamp set. This set made the perfect sentiment for this card. I sure hope that Lawn Fawn plan's to release more of them.  


To make the front of the card, I cut 1/2" strips of paper from White Woodgrain cardstock. I also cut a piece of the cardstock, 4.25" x 11.0". I scored the paper at 5.5". To determine where I wanted to cut off the bottom of the front of the card, I laid out my sentiment where I wanted it making sure that I allowed room for the flowers to come up on the left hand side of it. I made a tick mark on one side and then cut the bottom off.

To start making my fence pickets, I glued the vertical pieces 1/4" from the outside edge, then I centered the third piece between those two pieces. I flipped the card over, and glued strips horizontally placing them 1/4" apart. I wasn't too worried about lining them up on one side because once they are placed, I trimmed them off with my paper cutter.

I placed my flowers in my watering can making sure that they didn't cover up the sentiment . After I adhered the watering can to the bottom of the card, I placed thin foam dots, to give the card just a little bit of dimension. I did add a little bit of glitter using Stickles for the edges of the flowers and the hearts.

This is a pretty quick and easy card to make and it doesn't require a lot of different stamps or dies which is nice also.

Thanks for stopping by and I sure hope that you have a great day!!!

Sandy

You Tube Video

Tuesday, April 9, 2024

Cheers!


Hello my card making friends. Just a quick post this week. I wanted to participate in the current Lawn Fawnatics challenge - #170 - Use Patterned Paper. If there is one think I have plenty of it's patterned paper. I just can't help myself when it comes to buying it, but then I have to force myself to use it. I know it's weird, but sometimes, I just like to look at it.

I hadn't had a chance to use Lawn Fawn's Build A Drink Mason Jar Add On, so I thought I would use this as on opportunity to make a nice cool glass of lemonade.

I used Stripes and Sprinkles collection for the little shaker jar. To soften the edges and add a little extra dimension, I used Mustard Seed Distress Oxide Ink to shade the edges and make it appear that there was a concentration of liquid in the bottom of the glass.

To make the shaker "well" I cut six layers of plain white cardstock using the jar outline. I glued those on to the the solid jar shape making sure to add my handle between a few of the layers. I did cut an extra handle out of white card stock to glue my handle cut from patterned paper because I felt like it needed just a little beefing up. For the larger lemon slice at the bottom of the glass and the one on the straw, I cut them from patterned paper and Sunflower cardstock using the lemon from the Build A Drink die set. From the same die set, I cut the ice cubes from acetate paper. I love how these look in the jar. The smaller lemon pieces that are loose in the jar are cut using lemon from the Woodland Critter Hugger Summer Add On. The larger lemons on the side of the jar are from the Zesty Lemon die set. For the half slices, I made the full slice and then cut it in half. I also used the Mustard Seed Oxide Ink to add a little more color to the patterned paper to make sure the colors tied into the ones on the jar.

The straw, large sentiment and the background paper are cut from an older Lawn Fawn patterned paper collection called Perfectly Plaid Spring. The blue background paper is from the older Perfectly Plaid Rainbow Petite Paper Pack.

The for the sentiment, I used the Scripty Cheers die. I stamped the "sending smiles your way" using the new Henry's Build A Sentiment: Spring.

I think this is a cheerful card and it could be given for multiple occasions. Thank you for stopping by and I am sending smiles your way!

Sandy

Tuesday, April 2, 2024


Hello my cardmaking friends. Happy April! My husband and I celebrated 41 years of marriage on April Fool's Day. People always think I am joking when I tell them we were married on April 1st but it is the truth.

Over the weekend, I wanted to play with Lawn Fawn's new Stitched Garden Veggies. I couldn't decide if I wanted to put cute little faces on the veggies or just leave them plain, so I did a card with both. It is fun to see how different a card can look with just a few little tweaks such as color and faces. Each card has it's own veggie vibe.

I like interactive cards and I like the challenge of making them, so for this card, I used the Magic Iris and the Magic Iris Sunflower Add On.  


For this happy little card, I cut the sunflower from Sunflower cardstock and touched up the edges with a little Wild Honey Distress Oxide Ink. I also cut a piece of cardstock to 4.0" x 5.25" to mount the completed Magic Iris part of the card on. This gives the card a nice little edge of yellow between the gingham and the dark brown. The background paper is from an older Lawn Fawn paper collection called Gotta Have Gingham Rainbow. I used the bright green pattern and lightly touched up the edges with Mowed Lawn Distress Oxide. The dark brown cardstock that is the interactive mechanism is cut from Ground Coffee cardstock. I also used that color cardstock to make the card base.

The greens on the veggies are cut from Algae and Noble Fir cardstock, touched up with a little Rustic Wilderness Distress Oxide Ink. The tomato is cut from Barn Red cardstock touched up with Aged Mahogany Distress Oxide. The cauliflower was cut from Speckled Eggshell cardstock touched up with Antique Linen Distress Oxide Ink. The little cheeks are cut from a scrap of Guava cardstock.

I used the Hello Scripty die to cut the sentiment from Paper Bag cardstock. To add some interest to that cut out, I added "stitching" to it using a white gel pen. The sentiment in the center of the sunflower is from the Veggie Happy Day stamp collection. I heat embossed it using white heat embossing powder.  


Everything on this card is the same except for the background paper and the cardstock used for the sunflower. The cardstock used for the sunflower is Sticky Note cardstock touched up with Wild Honey Distress Oxide Ink.  I also cut a piece of cardstock to 4.0" x 5.25" so mount the completed Magic Iris part of the card on. This gives the card a nice little edge of yellow between the gingham and the Paper Bag cardstock that makes the card base for this card. The background gingham is from the Fruit Salad Collection touched up with Walnut Stain Distress Oxide Ink. The brown that is the interactive part is cut from Chocolate Bar cardstock.

As far as the construction of the Magic Iris, I am linking to the Lawn Fawn tutorial that was released with the Magic Iris die.

Lawn Fawn's Intro to Magic Iris You Tube Video

I will also link to my YouTube video that shows the process of this card from start to finish at the bottom of this post.

I love how different these two cards came out just using different colors of paper and using those sweet little faces on some of the veggies. I hope you have been inspired to make your own little veggie cards.

Thanks for stopping by and I hope you have a fantastic day!!!

Sandy

My You Tube Video