Tuesday, May 28, 2024

B'Day Moolah!


Hello my crafty friends! I just love that Lawn Fawn came out with this new stamp collection How You Bean Money Add On. I prefer to give cash as opposed to gift cards so this one is just perfect for me.

I cut the background from a satiny paper I got from Hobby Lobby. I love this paper. It comes in Red, Green, Black, and Blue. I always stock up when it is 40% off.

I used the new Itsy Bitsy Polka Dot Background Hot Foil Plate with Green Glimmer Hot Foil. I cut that just wide enough to accommodate the stack of money from the How You Been Money Add On and a mouse from Whoosh, Kites and a mouse from You Autumn Know.

The little mice along the top along are from the stamp collection Simply Celebrate Critters. The words in the little speech bubbles are from that stamps set along with a couple from the How You Bean Money Add On.

The words were cut with Finley's ABC's.

On the inside of the card, I hot foiled another piece of cardstock with the Itsy Bitsy Polka Dot Background Hot Foil Plate and then used the Money Pocket die to cut out a pocket to insert the cash in. I decorated the pocket with some leftover pieces that I colored from the How You Been Money Add On set.  


Monday, May 27, 2024

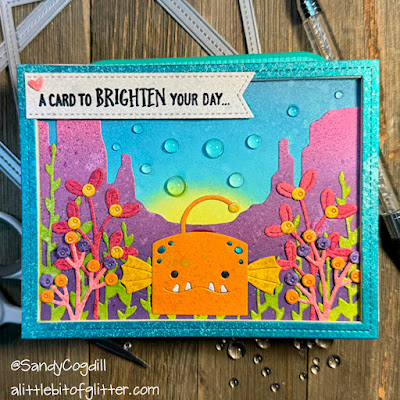
A Card To Brighten Your Day


Hello. I am just wrapping up the Memorial Day holiday weekend. This is going to be a crazy summer for me and I don't expect to be doing a lot of card making. My son will be married in August, and I will be helping my future daughter with her flower arrangements including bouquets, centerpieces, wedding arch arrangements, corsages, boutonnieres and anything else that might come up. We are kicking everything off this next weekend of with a Bride's Spa Weekend at the Hot Springs in Glenwood Springs. I may need to go back when its all over.

Anyhow, this is my entry for the current Lawn Fawn Challenge #173 - All Dies. I wanted to use the Desert Canyon Backdrop as an underwater canyon for a card so I dug around in my stash to see what else I could find that would tie in and I found this silly little Anglerfish and the rest just fell together. I just had a ball playing with Distress Oxide Inks and Distress Mica Sprays.

For the background, I ink blended, Squeezed Lemonade, Salvaged Patina, Mermaid Lagoon and Uncharted Mariner Distress Oxide Ink. I spritzed the background with Shiny Bauble Mica Stain. For the paper that I cut the Desert Canyon Backdrop out of, I ink blended Picked Raspberry, Seedless Preserves and Villainous Potion. I spritzed the paper with Hocus Pocus Mica Stain.

For the green seaweed, I spritzed Cilantro cardstock with Wicked Elixir Mica Stain and then cut it out with the Bayou Backdrop. I glued that on top of my Desert Canyon Backdrop. The other seaweed is cut from Merry Mistletoe. I spritze Ballet Slipper cardstock with

Winterberry Distress Mica Stain and Guava cardstock with Cocktail Distress Mica Stain. I spritzed a scrap of Sugarplum cardstock with Ominous Twilight Distress Mica Stain for the berries on the seaweed.

For the Anglerfish, I spritzed Fake Tan and Sun Flower cardstock with Harvest Moon Distress Stain. White Cardstock with Frozen Fog with Distress Stain. I used the Tiny Gift Box Anglerfish Add On die to cut out the fish.

I spritzed Tide Pool cardstock with Dylusions Vibrant Turquoise Ink Spray and then used the largest of the Stitched Rectangle Frames to cut out the frame for my card. I popped the frame up on foam tape to add a little dimension to my card.

I heat embossed the sentiment on the medium sized Stitched Sentiment Banner using the sentiment from the Anglerfish Flip Flop.

I really enjoyed making this card, however, I may have mica stain under my fingernails for a few days.

Thanks for stopping by and I hope your day is "bright"!

Sandy

Saturday, May 25, 2024

Treats On The Beach!

 Hello again! I have been having the best time playing with Lawn's Fawn's latest release. I am just crazy about the new Treat Cart stamp collection. When I was thinking about how I would create a scene, I thought that the beach would make a fun setting. I also thought that I would try to add swim suits to my little friends and well...... that just makes me giggle.

I needed a lot of area for this card, so I decided to do a slimline card. To create my sandy area, I tore a ragged strip from the top edge of some Low Tack Mint Tape. I adhered it roughly an inch from the bottom edge. I made sure to set aside the strip that I tore off because I needed to use it as a mask once I was done inking my sandy area. I also used some Post It Notes to cover the area above the tape to protect that area because I tend to get carried away when I ink blend.  

I used Tea Dye Distress Oxide to ink this lower area. I will go back and lightly ink the top area where the tape is torn and lay down a light coat of Vintage Photo Distress Oxide. I will also water down the same distress oxide ink and spatter the sandy area to give it a little definition.

Once the ink is dry, I will take the scrap tape that I set aside and place it over the top edge of the inked edge of the sand to protect it from where I will start to place the water. I will also use the Post It Notes again to protect the area that I have just completed.  


Since there isn't a slimline ocean wave stencil available through Lawn Fawn, I taped their Ocean Waves Stencils together. I am just going to do one layer of waves so for the base color, I used Salvaged Patina and then went back over the top edge with a light touch of Mermaid Lagoon.

For the sky, I used the Slimline Cloudy Stencil and Tumbled Glass. I will also thin down that ink with water and splatter the sky area to give the sky a little dimension.

From the Algae and Paper Bag Cardstock, I will use the Palm Trees and Hammock and Trees dies to cut out a number of palm trees. I will touch up the edges of the tree trunks with Vintage Photo Distress Oxide Ink and the palm fronds with Rustic Wilderness Distress Oxide.

All my images are from the Treat Cart stamp collection with the exception of the little squirrel, she is from the Let's Go Nuts stamp collection. The "cool" lettering on the treat cart is from the Snow Cool stamp collection. I thought my little friends would be adorable sporting swimwear, so I penciled it in and then used a micro marker to finalized the lines before I colored them.

I used Copic markers in the following colors:

  • C5, C3
  • Y04, Y06, Y08
  • Fox - Y23, Y24, Y27, Y32
  • Bear - E21, E23, E25
  • Squirrel - E31, E33, E35
  • Rabbit - E51, E53, E55
  • BG000, BG10, BG13
  • Y19, YR04, YR07
  • R20, R21, R22

I used the bench from the Build A Greenhouse to place the sundae that my little squirrel is eating - it was just the perfect height. Everything except the palm trees and banners are popped up with foam dots to add a little dimension to the card. And I built the sentiment from the Treat Cart stamp collection.

I would just love to join these little guys for a day on the beach. How about you? Thanks for stopping by and I hope you have a fantastic day!

Sandy


You Tube Video

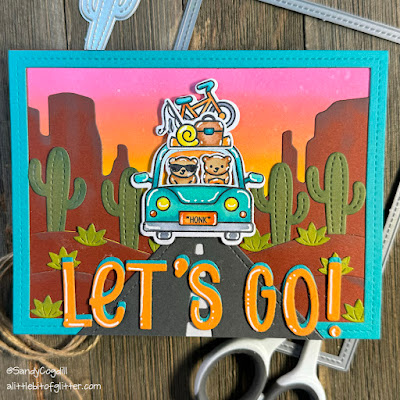
Let's Just Go!


Hello friends! It is finally that time of year to get in that car and just go! Before we had kids, we would just load up and car and just go and explore with no destination in mind. Once we had kids, we did road trips every summer. Since we live in the West, we saw a lot of desert and cactus. This card reminds me of those days. Arizona definitely has those beautiful sunsets.

For this card, I inked the background using Picked Raspberry, Ripe Persimmon and Mustard Seed Distress Oxide. Once I had those colors blended, I spritzed it with water and dabbed it with paper towel to give the background a little interest.

I cut the backdrop from rust colored cardstock using the Desert Canyon Backdrop die. I added a little Vintage Photo Distress Oxide Ink to the edges to add dimension. The cactus and desert bushes are also from the Desert Canyon Backdrop. They were cut from scrap green cardstock and the edges were touched up with Rustic Wilderness Distress Oxide Ink.

The letters are cut from Peacock and Fake Tan cardstock using Henry's ABC's. I also cut the frame from Peacock cardstock using the Stitched Rectangle Frames. The road is cut from Storm Cloud cardstock using the On The Road Boarder.

The stamp collections that I used are Car Critters and Car Critters Road Trip Add On. I colored the images with Copic markers in the following colors:

  • BG23, BG45, BG49
  • YR14, YR18
  • E13, E99
  • E31, E97, E99
  • Y04, Y08
  • C2, C4, C5

This was a fairly quick card to make and is definitely colorful. I hope that you enjoyed following along in the process.

Thanks for stopping by and I hope you have some fun trips planned for this summer.

Sandy

https://www.youtube.com/watch?v=DJQofvEkpSw

Friday, May 24, 2024

Wishing You A Carefree Day!


Hello! Hello! I hope you are well and are enjoying these final days of spring. It won't be long and we will be in the dog days of summer.

Oh my goodness. I just am loving the new goodies from Lawn Fawn. I am totally crazy about all of the mice that they do, so any new stamp collection with mice is a "must have". This card features the stamp collection, Whoosh, Kites. I knew when I saw this set that I wanted to make an interactive card where the kite moved. Of course, I didn't have the Swish Pull and Pop Pull Tab, so I had to add it to my ever growing Lawn Fawn growing collection.

For the sky background, I used Robins Egg Spiffy Speckles paper. I used the Cloudy Stencil with Chipped Sapphire Distress Oxide Ink to add some very light clouds. For the grassy pieces I used Pesto Spiffy Speckles along with the Simple Stitched Hillside Borders and Stitched Hillside Borders. I touched up the edges with Mowed Lawn Distress Oxide Ink. I cut the picket fence from Yeti Spiffier Speckles Cardstock using the Little Picket Fence Border.

I glued the Little Picket Fence Border along with the matching Stitched Hillside Border on the back layer of the card. I then started to place the Swish Pull and Pop Pull Tab mechanism. Once I decided which mouse I wanted to fly the moving kite, I was able to determine where I wanted to place the acetate arm and pull tab. For this card, I used the third hole in from the left. I also put foam dots where I wanted the acetate arm to stop moving on both the right and left side.  


I'll add foam tape to the front Simple Stitched Hillside Border Piece making sure that my acetate arm and pull tab is able to move freely. Before I add the foam tape, I will stamp the sentiment and cut the notch opening.

Once I determine where I want my little mice to stand and where my kites to fly, I will attach a piece of white cord to attach the kite to the mouse. Then I will finish placing all the rest of the little pieces to finish setting the scene. I did pop up the mouse in the back and the kite that doesn't move to keep the dimension consistent on the card.  


I used Copic Markers to color the images in the following colors:

  • B02, B04, B26
  • Y02, Y06, Y08
  • Y19, YR04, YR07
  • R20, R22
  • BG11, BG13, BG15
  • R05, R24, R46
  • YG05, G14
  • E51, E53, E55
  • C0

I just think this is the sweetest little card and I hope you do also. Thanks for stopping by and I hope you have a carefree day also.

Sandy


You Tube Video

Monday, May 13, 2024

Sending You Lots of Sunshine


Hello! It has been just a little bit since I have posted. Life has been a little crazy, but for Mother's Day, I gave myself the gift of time to work on a card.

This card was created for the current Lawn Fawn Blog Challenge #172- Inspired By. The challenge was to create a card that was inspired by one of the Lawn Fawn designers. The designers are all amazing and it was had to select a card. I decided that I would use a card that was created by Tammy Stark. I always love her color selections.  


For the background, I used the Ombre paper from the Rainbow Ever After Petite Paper Pack. I cut the Flower Garden Backdrop and Grassy Border from Pesto Spiffy Speckles paper. I used Rustic Wilderness Distress Oxide Ink to add additional color and dimension. For the flowers and butterflies, I used scrap paper from the Watercolor Wishes Petite Paper Pack. I touched up them up with, Dried Marigold, Wilted Violet and Worn Lipstick Distress Oxide Ink. I also cut out the Build A Green House from the Watercolor Wishes Paper. I used vellum paper to back the green house. I placed some of my colored flowers behind the vellum to give the appearance that there are still flowers in the green house. The bench from the Build A Green House was cut from Light Brown Woodgrain Cardstock.

I used the Garden Mouse stamp collection for all the little images. I did pop those up using foam squares to add a little dimension to the card.

The Copic Markers in the following colors:

  • YG61, YG63
  • R20, R21
  • BB02, BV11
  • E13, E99
  • R20, R21
  • R81, R85
  • YR20, YR21
  • E51, E53,E65

I framed my card the pink patterned piece from the Rainbow Ever After using the Stitched Rectangle Frames.

I really like the way this card turned out and it could be used for a multiple of occasions. I just love that little mouse - she takes such good care of her flowers.

Thank you for stopping by. I hope you have a fantastic day!

Sandy

Wednesday, May 1, 2024


Hello my card making friends! I hope you are all doing well.

Today I have a card that features Gerda Steiner's sweet little Hippo. I can't help but smile every time I look at him. He is adorable in this little t-shirt and of course dressed up in his "hero" costume.

When Lawn Fawn came out with their Give It A Whirl die, I knew right away that this card was going to be made and I couldn't be more pleased with the way it turned out. I will hang on to this one until I find just the right person to give it to.


For this card, I stamped Hippo With Butterfly and Hippo In Disguise, on X-Press It Blending Card for Copic Markers. I also, stamped each image on Inkadinkado-stamping Masking Paper because I wanted to ink blend on top if each image as opposed to cutting them out. I used Copic markers to color each of the images.

The Copic colors used are:

  • Y13, Y17
  • R24, R27, R29
  • B63, B66, B69

Once I had my little friend colored and covered with the masks, I blended Mustard Seed Distress Oxide Ink on top. I then used the Give It A Whirl die to line it up and cut it out.

To assemble the mechanism, I suggest watching the Lawn Fawn tutorial for detailed instruction. I struggled a bit on the construction of the first couple of ones that I made, but have found each additional one has been much easier.

Once I had assembled the Give It A Whirl, I decided that I wanted a blue frame around it to make it stand out. I cut the largest circle piece of the die out of a blue metallic cardstock, then I placed a circle die in the middle and ran it through my die cut machine. I am hoping that Lawn Fawn will eventually come out with a frame that will fit this die.

I stamped the sentiment using Lawn Fawn's Thanks Thanks Thanks stamp collection, trimmed it down and then adhered it to a piece of yellow cardstock and then trimmed it down again.

I wanted the background of the card to have a little bit of pizazz but I didn't want anything competing with my little friend. I used a Hot Foil plate from Spellbinders called, Hypnotic Background with Cobalt Glimmer Foil.

This was a really fun card to make and I hope you have been inspired to make one also. Thanks for stopping by and I hope you have an amazing day!

Sandy