Wednesday, July 31, 2024

No Tricks, Just Treats


Hello there! I have another really fun Halloween card featuring the Where Is The Candy stamp set from Gerda Steiner Designs. We are dog people in our house. Our current furbaby is Quincy. He is a little derpy but very stubborn - that is probably because he is part Great Pyrenees. I am certain that he would never put up with a Halloween costume, so I'll just have to be satisfied coloring ones that will.

These pals are a very quick color. I used COPIC markers in the following colors:

  • YR23, YR24, YR27, YR20, YR21
  • T2, T5, T7
  • VO1, V04, V07
  • YR02, YR04, YR09

The stamps and dies used are:

  • Where Is The Candy
  • Happy Howloween - Lawn Fawn
  • Finley's ABC's - Lawn Fawn
  • Riley's ABC's - Lawn Fawn

  • The background was inked with the following Distress Oxide Inks:
  • Uncharted Mariner
  • Mermaid Lagoon
  • Twisted Citron
  • Rustic Wilderness - highlighting on grassy area.

I think this card might be sent to Dr. Shannon, Quincy's vet. I'll have to see what Quincy thinks.

Thanks for stopping by and I hope you are doing well!

Sandy

Enjoy The Summer


Hello! I don't know about you but here in Colorado, we are having one of the hottest summers I can remember. It is so hot that it makes you want to take a dip in the swimming pool.

For this shaker card, I used the Pool Piggies from Gerda Steiner Designs. Aren't they just the cutest? I can't decided which one is my favorite.

The coloring for this card was done with Copic Markers in the following colors:

  • V01, V04, V06
  • YR02, YR04, YR09
  • Y02, Y06, Y15
  • RV14, RV17,RV19
  • B00, B02, B04
  • R00, R20, R21
  • T2, T5, T7

To make the shaker card, I used the Peakaboo Backdrop from Lawn Fawn. I like that die for shaker cards because you can put different shaker bits in the different windows or leave some out if you want. For this card, I used the same bits in all the openings.

Once again, I just love the little illustrations that Gerda does. They are just so fun and whimsical.

Thank you for stopping by today and I hope you are enjoying the summer like these little piggies!

Sandy

Saturday, July 27, 2024

Warmest Wishes


 Hello! I hope all is well with you. Today I have a card that I am entering in the Lawn Fawn Blog Challenge - 177 Christmas in July. It has been so hot here that it is a little hard to wrap my head around Christmas, so I decided to us the Critters In The Desert with a few little Christmas elements. I hope you like it!

All coloring was done with COPIC markers in the following colors:

  • W00, W1, W3
  • Y06, Y17, Y38
  • YG03, YG93, YG95
  • YR23, YR24, YR27
  • R14, R29, R39

The background inking was done with Distress Oxide Inks in the following colors:

  • Mustard Seed
  • Ripe Persimmon
  • Rusty Hinge
  • Tea Dye
  • Vintage Photo

The stamps and dies used for this card are:

  • Cheery Christmas
  • Critters In The Desert
  • Winter Skies
  • Ready Set Shake
  • Desert Canyon Background
  • Ugly & Bright - hat
  • Build A Snow Globe
  • Beachy Christmas - sentiment

Thanks for stopping by.

Sandy


Monday, July 22, 2024


Hello there my card making friends. Did you know that there are only 102 days left until Halloween? It is my all time favorite holiday and I have already been out and about looking for new Halloween decorations. I go all out decorating my house, in fact, it takes me about two to three days to complete it. I have been collecting pieces for a Halloween Village for close to 20 years now, so it has definitely grown.

I got some new Halloween stamps from Gerda Steiner Designs, last week and I couldn't wait to start playing with them. The ghosts on this card are from the Ghost stamp collection and the Pumpkin is from the Gourds stamp collection.

I inked the background using Distress Oxide Ink. I wanted a moon in the upper right corner, so I used the Nighttime Sky Stencil from Lawn Fawn to place it. I used Squeezed Lemonade and Dried Marigold for the moon. The rest of the card was done in Wilted Violet, Mermaid and Twisted Citron. Once it was inked, I left the moon covered with the stencil cut out and spritzed water on the card and then dabbed it off with a paper towel. I also spattered black watercolor paint over the card to add a little be bit of interest to the background.

The haunted tree house is the Mini Slimline Tree House die set from Whimsy Stamps. The gravestone is from Lawn Fawn's Spooky Forest Backdrop. Both of them were cut from black cardstock. The lettering on the gravestone is from All The Speech Bubbles from Lawn Fawn.

I didn't have the right color of green for the lettering, so I inked white card stock with Twisted Citron and then cut the letters out with Henry's ABC's from Lawn Fawn. I brushed Villainous Potion on the bottom half of each letter. To add a little bit more dimension to the letters, I cut the letters out of a blue cardstock and then glued my inked letters on top with a slight offset. The other part of the sentiment is heat embossed with black embossing powder. I used Harold's ABC's from Lawn Fawn for the lettering.

I used Copic markers to color the the ghosts and pumpkin in the following colors:

  • YG06, YG17
  • BG000
  • YR02, YR04, YR09
  • RV10

  • I hope you enjoy this card as much as I do.

Thanks for stopping by and I hope you have a great day!

Sandy

Under The Weather


Hello friends!  I hope you are well.  I recently needed a get-well card and realized that I really hadn’t made very many, so I definitely needed to change that.  I figured a good start would be to use this cute little friend from Gerda Steiner Designs.  Gerda always captures a moment.  This stamp set is called Under The Weather.

To create the background, I blended Uncharted Mariner, Peacock Feathers and Salvaged Patina Distress Oxide Ink.  Once I liked how it looked, I spritzed it with a little water and then spattered a little silver metallic watercolor. 

Although I have both a raindrop background die and a stencil, I thought that the Stitched Windy Backdrop die from Lawn Fawn would give me a more subtle pattern. 

I used the On Solid Ground stamp from My Favorite Things for the cobblestone sidewalk.  Once I cut that out, I quickly realized that I was going to have to lift that sidewalk up a little bit to be able to get my little friend higher up towards the top of the card.  I decided that I could cut a strip of grass using the Grassy Border die from Lawn Fawn, which was also a perfect place to add my sentiment. 

Once I had the grassy piece cut out, I added a little Rustic Wilderness Distress Oxide to add a little dimension.  I heat embossed the sentiment with white embossing powder. 

After I attached the grass and sidewalk to the card, I was still looking for a little more height, so I added a little fence using the Little Farm Fence from Lawn Fawn.  I used a really light gray cardstock for the fence and added a little Pumice Stone Distress Oxide Ink to tone it down a little.  

Coloring in my little mouse was the fun part of the card.  I used Copic Markers in the following colors:

  • Y15, Y19, Y38 - yellows
  • W00, W1, W3 - mouse
  • R05, R14, R29 - reds
  • BG23, BG13, BG18 - blue greens
  • R20, R21 - pink accent
  • YR23, YR24, YR27 - bricks


Once I had my mouse attached, I added some little hearts as my raindrops and a few little clouds.  The clouds were cut from Lawn Fawn’s Simple Puffy Cloud Frames.  That is one of my favorite dies because it gives you the cloud shape but it still allows the background to show. 

I just love the way this card turned out. He is just so cute with his little umbrella! 

Thanks for stopping by and I hope you aren’t feeling “Under The Weather”.


Sandy

Monday, July 15, 2024

Thanks A Melon


Hello crafty friends. Today I have a card that was featured on the Gerda Steiner Designs Blog, which is so exciting! This card is so bright and colorful and who can't just smile at that watermelon slice with his attitude?

The watermelon image is Gerda's Thanks A Melon Printed Greeting Card. It is a digital file so no stamping needed.  I printed and cut it as the same size of the digital file. However, since it is a .jpg, I could have adjusted the size also. I used my Brother Scan and Cut to cut out the cute little watermelon.

The coloring was done with Copic Markers in the following colors:

  • RV11, RV13, RV14
  • YG06, G07

For the background, I wanted to kind of simulate the green strips on a watermelon.  I tried to ink white cardstock freehand, but I wasn’t getting the look that I was after.  I dug through my stencils and decided to use the Sunray Background Stencil from Lawn Fawn.  I used Twisted Citron Distress Oxide ink to cover the entire piece of cardstock, then  I used the stencil with Mowed Lawn Distress Oxide Ink.  I watered down some Mowed Lawn Ink and spattered the entire background.  I used a 4” x 5 ¼” die with stitched edge detail to cut out my background. 

I loved the sentiment that was on the printable but I thought I would mix it up just a little bit.  I used the Giant Outlined Thanks from Lawn Fawn and then I heat embossed “A Melon” using white embossing powder on black card stock. 

This was a really fun and quick to make. 

Thanks for stopping by and I hope you have a great day!

Sandy

Friday, July 12, 2024

You're The Sweetest


Hello friends. I posted this card on IG a little bit ago, but never posted it on my blog - so here it is!

Nothing better than spending time in the park enjoying cool treats with a friend. I created this card using the new Treat Cart stamp set from Lawn Fawn. I especially love the little hearts on the fence pickets - it reminds me of something you would see in Disneyland.

The images were colored with the following COPIC markers:

  • C1, C3
  • YR23, YR24, YR27 fox
  • E51, E53, E55 rabbit
  • Bear - E23, E25, E27
  • R00, R20, R21
  • Y00, Y11, Y13
  • BG10, BG11, BG53
  • B000, B91, B95

The stamps and dies used were:

  • Platform Pop Up
  • Platform Pop Up Add On
  • Platform Pop Up Picket Fence Wrap Around
  • Treat Cart
  • Shadow Box Park Add On - tree trunks
  • Tree House - tree tops
  • Sweetest Flavor

Thanks for stopping by and I hope you have a great day!

Sandy


Monday, July 8, 2024

Paws & Enjoy The Little Things


Hello Friends! Today I have a card that was featured on Gerda Steiner Designs Blog - which was a thrill for me!

This card was created with a one of her digital designs, called Dog And Butterfly. I didn’t change the size of the .jpg but I thought that since I was going to be printing it, I would add a sentiment.  I like punny saying so this one is perfect for this card.

As I have done in the past, after I print the illustration, I covered the dog and butterfly with a sticky note that has adhesive over the back of most of it, and then ran the paper through the printer again to create a mask.

Once my mask was cut out and applied, I used the On Solid Ground stamp from My Favorite Things to place the ground.  I then masked that off so I could start my ink blending.

For the grass, I used Twisted Citron and Mowed Lawn Distress Oxide Ink along with the Grassy Stencil from Lawn Fawn.  After the ink was set, I added a little of the Twisted Citron behind the grass blade to create a little more ground area.  With Stormy Sky Distress Oxide Ink, I laid in the clouds using the Cloudy Stencil from Lawn Fawn.  I then speckled the sky with some watered-down ink.  In retrospect, I wish I hadn’t done that because it does take away from the sentiment.  Oh well, next time, right? 

All the coloring is done with Copic markers in the following colors:

  • Y11, Y21, YR23, YR24 – dog
  • E31, E37, E47 – rocks and ground
  • R14, R29, R39 – dog collar
  • G07 – grass blades
  • RV52, RV55 – butterfly

Once it was colored, I used a 4” x 5 ¼” stitched edge die to cut it out.  I like to use this die because I like to have a border around my cards.  I chose a pink colored card stock to bring out the little butterfly. 


I really enjoy using digital stamps because they are so quick to make and take very minimal supplies. 


I hope you have been inspired to create a card of your own. 


Thanks for stopping by and remember to “Paws And Enjoy The Little Things”!

Sandy

https://www.instagram.com/p/C9L9VSvN7Yx/ 

Sunday, July 7, 2024

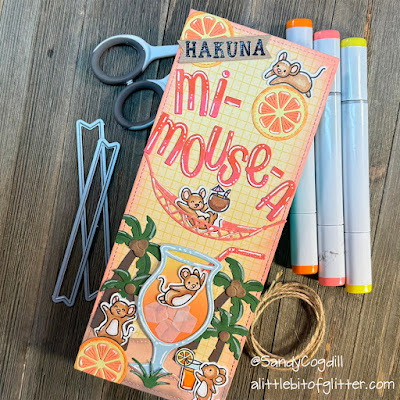
HAKUNA Mi-MOUSE-a

Hello my creative friends. The 4th of July has come and gone and we are in the full hot days of summer here in Colorado.

I created this card for the current Lawn Fawn Blog Challenge #176 - Fun With Food. I wasn't sure what I was going to do until my youngest son suggested doing a card with my favorite little mice. He came up with the mi-MOUSE-a and I added the Hakuna. It was a little of a struggle to get started but I love how this card turned out.

The background of the card is a piece of the new Pint Size Patterns: Summertime paper collection. I used a little Picked Raspberry Distress Oxide Ink on the edges.


I cut the letters using Henry's ABC's die set. I cut them out of Raspberry Cardstock and then added Ripe Persimmon Distress Oxide Ink on the upper portion of the letter. The little "Hakuna" sign at the top is heat embossed using Riley's ABC's.

The oranges are cut using the Zesty Lemon die set. To make it look like an orange I used white cardstock that I had inked with Ripe Persimmon Distress Oxide Ink. The yellow part of the orange is cut from a very pale yellow cardstock. I did ink the very outside of the yellow to help it look more like and orange.

The hammock is from the Hammock And Trees die set. It is cut from patterned paper. The palm trees were cut using the Palm Trees die set. I used Chocolate Bar, Paper Bag and Noble Fir Cardstock.

For the mi-MOUSE-a, I used the Build a Drink and Build A Drink Cocktail Add on. For the inside of the glass, I inked Squeezed Lemonade, Dried Marigold and Ripe Persimmon on white cardstock. For me, it is easier to use ink blending on larger areas rather than try to color with Copic markers. I cut the ice cubes out of vellum and sandwiched them in between the inked paper and the acetate that I had also sandwiched in between 2 layers of cardstock for the outside frame.

The sand at the bottom of the card is white cardstock inked with Tea Dye Distress Oxide Ink with the edges touched up with a little Vintage Photo Distress Oxide Ink. I used the Stitched Hillside Border to cut the top of the sand. I used the Sandy Beach Accents die, to cut the slot that the drink sits in.

The mice are from the You Autumn Know and Bubbles of Joy stamp sets. The drinks are from the Beachy Christmas and Make Lemonade stamp sets.

I am not sure what sentiment I am going to put on the inside. Maybe I will just leave it blank.

I hope this card has inspired you. Thank you for stopping by and I hope you are enjoying your summer.

Sandy

Tuesday, July 2, 2024

A Perfect Summer Day For Snorkeling


I have another fun summer card with those adorable Summer Gnomes from Trinity Stamps.  

Again, I wanted to do an interactive card but this time I wanted the snorkeling gnome to move up and down.  I felt like I needed to so a slimline card to be able to have him move up and down and still have another gnome floating in the pool.  I also had to trim down the Backyard Pool to make the card "work".  

I used Tumbled Glass and Salvaged Patina to ink the water in the pool.  I used the Cloudy Stencil from Lawn Fawn to ink in the clouds with Tumbled Glass Distress Oxide.  

I used the Waving Pull Tab die set from Lawn Fawn to make my gnome move up and down.  I did have to modify it a little bit so that the die set would work with the length of the slimline card. 

All the coloring was done with Copic Markers in the following colors:

  • Pool Brick - E08, E21, E97
  • Fence - E17, E34, E47
  • Grass - YG03, YG17, G07
  • Rock - N1, N3, N5
  • Yellows - Y13, Y15, Y17
  • Blues - B12, B24, B28
  • Oranges - Y38, YR04, YR07
  • Reds - R22, R35, R39
  • Gnome Skin - E000, E00, E02
  • Gnome Beards - N0, N1, N3
This is definitely one of my favorite cards!

Thanks for stopping by and I hope you have a fantastic day!

Sandy


Monday, July 1, 2024

Wishing You A Summer Like Gnome Other


I just love gnomes and the Trinity Stamps gnomes are the best.  These fun friends are just having the best time, living their best life at the pool.  

When Trinity Stamps released the Summer Gnome Fun stamp set, they also released the Backyard Pool stamp and die set.  This swimming pool is just the best.  

For the pool, I used Tumbled Glass and Salvaged Patina Distress Oxide Ink.  I used a stencil to help me create the shimmery look of water, but I don't know who the manufacturer is. Sorry.  

I enjoy interactive cards, so I used the Slide On Over die from Lawn Fawn for my little friend floating in the inner tube.  

All the coloring was done with Copic markers in the following colors:

  • Pool Brick - E08, E21, E97
  • Fence - E17, E34, E47
  • Grass - YG03, YG17, G07
  • Rock - N1, N3, N5
  • Yellows - Y13, Y15, Y17
  • Blues - B12, B24, B28
  • Oranges - Y38, YR04, YR07
  • Reds - R22, R35, R39
  • Gnome Skin - E000, E00, E02
  • Gnome Beards - N0, N1, N3

The sentiment is from the same stamp set.  I heat embossed it with black embossing powder.

Wouldn't you just love to spend a day at the pool with these fun guys?

Thanks for stopping by and I hope you have a fantastic day!


Have A Sweet Day


It would be hard not to have a sweet day in the company of this sweet little hedgehog!

This card was created with a digital printable greeting card from Gerda Steiner Designs. The design is Hedgehog With Ice Cream.

The supplies used are:

Copics

  • E50, E51, E53,E43, E47 - hedgehog
  • R01 - cheeks
  • YG63, YG67 - grass
  • RV21, RV23 - pink ice cream
  • YR21, YR23 - cone
  • E21, E33 - chocolate ice cream
  • YR61, YR63 - orange ice cream


Distress Oxides

  • Spun Sugar
  • Shaded Lilac
  • Squeezed Lemonade
  • Peacock Feathers


Stencil

  • Bunting Background - Lawn Fawn

She is just the sweetest and I had such a great time coloring her!

Thanks for stopping by and I hope you have the "sweetest day" ever!

Sandy

Merry Beachy Christmas


All the coloring is done with Copic Markers in the following colors:

  • R02, R24, R39
  • YG06, G07
  • YR02, YR09,YR18
  • B01, B02
  • R81, R83, R85
  • BG10, BG11, BG32
  • Y02, Y08
  • E13, E15, E18
  • E51, E53, E55, E57
  • E42, E43, E44


The background inking was done with Distress Oxide Ink in the following colors:

  • Tea Dye
  • Vintage Photo
  • Tumbled Glass
  • Mermaid Lagoon
  • Peacock Feathers
  • Salvaged Patina


The stamps and dies used are:

  • On The Beach
  • Pool Party
  • Beachy Christmas
  • Little Snow Globe Bear
  • Offset Sayings:   Christmas
  • Henry’s ABC’s
  • Reveal Wheel Square Add On


The stencil used are:

  • Ocean Waves
  • Hillside
  • Cloudy

This would be the perfect card to send to a family that might be spending their Christmas on a beach. What do you think?

Thanks for stopping by and Merry Christmas - a wee bit early!

Sandy