Monday, October 28, 2024

Critters In The Desert


Hello!  I created this card for the current Lawn Fawn Challenge #183- Monochromatic.  I have got to say this is the challenge that I struggle with every time.  I decided that I would stick to grays this time, so I thought that the Critters In The Desert and Wild Wolves would make a fun Black and White television show.  


I used Copic markers to color the scene.  The range is W00-W9.

To make the TV I used the Small Stitched Rounded Rectangle Stackable to cut out the "set".  I used beverage die from the Woodland Critters Summer Huggers Add On.  For the base where the antennas are connected, I used a die from the Plant A Succulent Die set.  The antennas are cut from the  Little Flowers die set.  They are the plant stem with the leaves cut off.  

I touched up the edges of all the cut images with a little Distress Oxide Ink in Black Soot, Hickory Smoke and Pumice Stone.

The "happy birthday" part of the sentiment is from Henry's Build A Sentiment: Spring and the "enjoy it to the fullest" is from the Wild Wolves stamp set.  Both were heat embossed with black embossing powder. 

Thanks for stopping by and I hope you have a great day!

Sandy


Sunday, October 27, 2024

Apple Picking


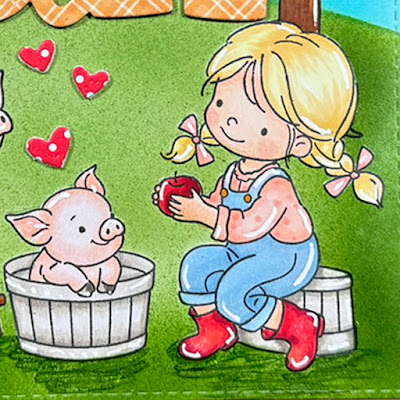
Hello!  I have another Hello Bluebird card using two of their recently released stamp collections.  I am new to Hello Bluebird products and I have to say they are some of the sweetest stamps.

I used my Copic markers to airbrush the background of this card also.  However, I wanted to try to use stencils to create a landscape.  I think it worked out pretty good.

To start on this card, I stamped and colored every image using Copic markers in the following colors:  

COPICS:
Apples & Boots
    R27, R29, R39
Leaves
    YG61, YG63, YG67
 Baskets
    W1, W3, W5, W7
 Skin
    E00, E01, E02
 Pigs
    ROO, R01, R02
Blouse & Inner Pig Ears
    R20, R21, R22
 Overalls
    B41, B91, B93
 Hair
    Y11, Y21, Y23
 Tree & Step Ladder
    E33, E37, E57


I had to create masks for all the images which, for the most part, was pretty easy, until I got to the tree.  I did the best I could but I still left small slivers of paper connecting the leaves to the tree.  I knew that once I had airbrushed the background, I could go back in this my marker to color in the white areas.  I also did the same thing where there was still a little white around the other objects.

The Copic colors I used on the background are:
    Grass - YG63, YG67
    Sky - BG000, BG01

The stamp and die sets are from Hello Bluebird:
    Apple Picking
    Apple Farm
    Hello Fall Words Die Set

I am really happy with the way this card turned out and I think the whole Copic airbrush system is going to be a game changer for me.

Thanks for stopping by and I hope you are having a great day!

Sandy


Saturday, October 26, 2024

Nuts For Fall


Hello!  I hope you are still enjoying the fall season.  It took forever for it to cool down in Colorado even though the leaves have changed and trees are just beautiful.

This card.... what can I say about this card?  Wow!!!  Just plain Wow!!!  I was inspired by Cristiana Reuling, @christygetscrafty.  She recently did a YouTube video showing the different Copic coloring for the squirrels from the Nuts For Fall stamp collection from Hello Bluebird. I can't thank her enough for the color combinations and the YouTube video.   

I also tried a new technique using my Copic markers as an airbrush.  The background believe it or not was airbrushed with markers.  It required a bit of masking, but it was totally worth the time.  

The stamp set is Nuts For Fall by Hello Bluebird.  These little friends are just the sweetest.  All the coloring was done with Copic markers in the following colors:

Squirrels
    E53, E55, E57
    E50.,E51 
Acorn
    E19, E99, YR24, YR27
 Pumpkin
    Y21, YR24, YR18
 Branch
    E55, E57, E59
 Leaf Combo's
    YR31, YR21, YR23
    YR12, YR14, YR23
    Y13. Y15, Y17
 Air Brush Combo (background)
    E31, E37

My white gel pen accents need some work but they are much better than they used to be.

I just love the way this card turned out.  Thank you so much for stopping by and I hope you are having an amazing Fall.  

Sandy


SEA-sons Greetings!


 Okay - just one more Gnome and that will be it for a little while.  I just couldn't resist doing this one because when the stamp set came out this past summer, I didn't make a card with the surfing gnome.

I used Lawn Fawn's Hillside Stencil and Tea Dye and Vintage Photo for the sand on on the background.  For the giants waves, I used Lawn Fawn's Ocean Waves Stencil along with Peacock Feathers and Broken China Distressed Oxide Ink.  For the clouds, I used Tumbled Glass Distress Oxide Ink along with Lawn Fawns Cloudy Stencil.  

I used the Summer Gnome Fun and Hau'oli Mau Lanui stamps by Trinity Stamps.  All the images were colored with Copic markers in the following colors:  

·       E000, E01, R20

·       G21, G24, G28,

·       BG45, BG45, BG57

·       R14, R17, R27

·       R27, R29, R39

·       Y02, Y15, Y19

·       C3, C5, C8

·       C0, C1

·       N2, N3, N4

The sentiment is from the Lawn Fawn stamps set - Christmas Fishes.

This card is proof that Santa, Mrs. Santa and his helper like a little beach time after Christmas day.

Thanks for stopping by and I hope you have a great day!

Sandy


Friday, October 25, 2024

Warmest Wishes


I have been looking forward to making this card since this stamp set came out last summer.  The stamp set is from Trinity Stamps and the Gnomes are from the Summer Gnome Fun, Backyard Pool and Hau'oli Mau Lanui stamp sets.  I had initially planned to use a regular Christmas Tree, but was thrilled to see that the recent release had a decorated palm tree for Christmas.  It was just perfect.

To start, I stamped the pool and then stamped it again on an adhesive masking paper.  I cut the water portion out of the mask and then trimmed it along the fence line.  I inked blended the sky using XXX and XXX Distress Oxide Ink.  I spritzed the sky with a little water and then went back and spattered it with watered down white acrylic paint.  

I used the same colors for the pool water using a stencil that looks like a stone walkway.  I don't know the vendor or the name of the stencil, I have had it a long time though.  To make the water, I inked over the stencil with Tumbled Glass and then moved the stencil to another position and inked Salvaged Patina over it.  


The images were all colored in with Copic markers in the following colors:

  • G18, YG17. G29
  • R20
  • B12, B23, B24
  • E000, E01
  • Y28, Y26, Y21
  • R14, R24, R39, R59
  • E50, E53, E55, E57
  • C00, C0, C1, C3, C4, C6, C8
To add to the festive spirit of the card, I added little holly to the gnomes swim tube.  


The palm tree wasn't exactly right, so I trimmed the sandy area off and used the packages as the base of the tree.  The little bag of presents are from the North Pole Gnomes set.  I needed something for the lower left side of the card - luckily I had one that had already been colored.  

The sentiment for this card is from the Hau'oli Mau Lanui stamp set.  I heat embossed it using black embossing powder and then colored it yellow with a Copic marker to soften the harsh white background.  

This card just make me smile.  I can just imagine these guys out for some R&R after a busy holiday season.  

Thanks for stopping by and I hope you have a great day!!!

Sandy


Thursday, October 24, 2024

Sledding Fun


Hello!  If you find yourself needing a quick card, this one might just work for you!  It only requires coloring one fairly small image and a sentiment.  You wouldn't even have to heat emboss the sentiment
to save even a little more time.  All the elements in this card are from Trinity Stamps products. 

The I used the Emergency Card Essentials # 1 & #2 for the card base.  The first cardstock layer is cut out with the largest of the rectangle die from set #1.  The second cardstock layer is cut with the largest rectangle die from set #2.  The patterned paper was cut from the smallest rectangle die from set #2.  The center circle is cut from the nested circles in set #1.  

The Gnomes are from the Sledding Fun stamp and die set.  I colored my little friends with Copic markers in the following colors:

  • E13, E15, E17
  • E000, E01, R20
  • G21, G24, G28,
  • BG45, BG45, BG57
  • R14, R17, R27
  • R27, R29, R39
  • Y02, Y15, Y19
  • C3, C5, C8
  • C0, C1
  • N2, N3, N4
The sentiment is from the Holiday Gnome Stacks.  I heat embossed it using black embossing powder.  

I glued all the pieces in place and then popped up the sled using a few foam squares.

I really enjoy the Emergency Card Essential Die Sets.  Sometimes, I just don't have time to ink blend a background and these sets make it really easy to have a nice symmetrical card.  

Thanks you for stopping by.  I hope that this card has given you some ideas to create a card of your own.  

Sandy


Wednesday, October 23, 2024

Sledding Fun


Don't these guys look like they are having the best time sledding down the hill?  

I created this card with Trinity Stamps products.  The Gnomes and the background are from their recent release. 

For the background of this card, I used the Emergency Card Essentials Die Set #1.  I used two different patterned papers.  I liked the snowflakes for the top and the simple plaid for the lower half of the card.  


I colored in the friends and trees using Copic markers in the following colors:

  • E13, E15, E17
  • E000, E01, R20
  • G21, G24, G28,
  • BG45, BG45, BG57
  • R14, R17, R27
  • R27, R29, R39
  • Y02, Y15, Y19
  • C3, C5, C8
  • C0, C1
  • N2, N3, N4
The sentiment on the upper part of the card is from the Simply Sentimental - Merry stamp and die set.  I heat embossed it using black embossing powder.  The sentiment on the lower half of the card is from the Sledding Fun set.  I really like that Trinity Stamps includes dies for most of their sentiments - it is a really nice finish if you don't stamp it directly on the card.

This card just makes me happy and I hope it inspires you to create a card too!  Thanks for stopping by and I hope you have an amazing day!!!

Sandy


Tuesday, October 22, 2024

SnGNOMEman


Oh my goodness, the stamp set SnoGNOMEman, but Trinity Stamps is just adorbs!!!!  They are all so cute, I can't even have a favorite.

For this card, I used the new Emergency Card Essentials #1 & #2 for the background on this card.  I cut the outer most cardstock layer with the largest rectangle die from the #1 set.  The second cardstock layer was cut from the largest rectangle from set #2.  The patterned paper is cut from the second largest rectangle in the #2 set.  I cut the ornament shape from patterned paper and then inked the edge a little to soften it.  I cut the ornament hanger from a metallic silver cardstock.


I colored the little snoGNOME using Copic markers in the following colors:

  • E13, E15, E17
  • E000, E01, R20
  • G21, G24, G28,
  • BG45, BG45, BG57
  • R14, R17, R27
  • R27, R29, R39
  • Y02, Y15, Y19
  • C3, C5, C8
  • C0, C1
  • N2, N3, N4
For the sentiment, I used Simply Sentimental - Merry and Simply Sentimental - Christmas.  I chose the one that looks a little whimsical, because it matched the whimsical look of the SnoGNOME.  I colored in the open spaces on the lettering with my red colored Copic markers and then colored in the white area with a light gray marker to tone the white down a little.

Once I had everything glued in place, I added a little silver bow to the top of the ornament to finish the card.  

Thanks for stopping by and spending time on my blog.  I hope you have an amazing day!

Sandy


Monday, October 21, 2024

Holiday Gnome Stacks


Santa and his helpers are very busy decorating this Christmas tree.  This fun bunch comes from the Trinity Stamps Holiday Gnome Stacks stamp and die set.  

The background was created using the Emergency Card Essential Die Sets #1 & #2.  The largest cardstock layer is cut using the large rectangle from Set #1.  The second cardstock layer is cut from the largest rectangle from Set #2.  The patterned paper is cut from the smallest rectangle in Set #2.  I also cut two strips of coordinating paper using the narrow rectangle/strip die from Set #1.  


I colored the Gnomes using Copic Markers in the following colors:

  • E13, E15, E17
  • E000, E01, R20
  • G21, G24, G28,
  • BG45, BG45, BG57
  • R14, R17, R27
  • R27, R29, R39
  • Y02, Y15, Y19
  • C3, C5, C8
  • C0, C1
  • N2, N3, N4
The sentiment was heat embossed on yellow cardstock using black embossing powder.  

This was a really fun card to make.  I hope this card has inspired you to make a card today!  Thanks for stopping by and I hope you have a great day!

Sandy


Sunday, October 20, 2024

Little Tree Gnome

Hello!  Just a quick one for today.  I just love the new goodies from Trinity Stamps latest release.  For this card, I used their new Emergency Card Essentials Die Set #1 and #2.  For the outermost cardstock rectangle, I used the rectangle die from Set #1. For the second  cardstock layer, I used the largest die from Set #2.I used an older patterned paper from Carte Bella for the third layer of the background using the smallest rectangle from Set #2.    I cut the largest hexagon from cardstock and the smaller one from patterned paper.  

The new Little Tree Gnome fits perfectly in the hexagon.  I really like this stamp set because the die is included.  I colored him using Copic markers in the following colors:

  • E13, E15, E17
  • E000, E01, R20
  • G21, G24, G28,
  • BG45, BG45, BG57
  • R14, R17, R27
  • R27, R29, R39
  • Y02, Y15, Y19
  • C3, C5, C8
  • C0, C1
  • N2, N3, N4


For the sentiments, I used the Simply Sentimental - Merry and Simply Sentimental - Christmas.  I used red heat embossing powder to emboss the sentiment.  The "Christmas" word I selected was just a smidge too large, but I left it hanging off the edge.  If it causes problems in the envelope, then I will trim it even with the edge of the card.  

This was a fairly quick card to make and the sentiment really makes the card pop!  

Thanks for reading and I hope that you are having an awesome day!!!

Sandy


Saturday, October 19, 2024

Trinity Stamps Emergency Card Essentials


I needed a few Halloween cards for a Facebook group that I belong to.  Over the last few years, I have exhausted my pre-made cards, so I decided that I would make a few this year.  Luckily, Trinity Stamps just released two new die sets that are perfect for making really quick cards.

I have an obscene amount of patterned paper, so I decided that this would be a perfect time to use some of it.  These were all made with the Emergency Card Essentials Die Set #1.  For the sentiments, I used my Silhouette Design Software to create the circles and lettering.  This was perfect because I didn't even have to get out my Silhouette machine to cut them out - there is a die in the set that is the perfect size.  Easy Peasy!  

For the following three cards, I used paper from the Halloween Magic collection by Echo Park.


For these three cards, I used the patterned paper from the Hocus Pocus Collection by Carta Bella.


I can't remember the last time I was able to make six cards in an afternoon.  That was so much fun that I made four more using Christmas paper.  I will post those cards next!

Thanks for stopping by and I hope you have a great day!

Sandy


Let's Go To Oktoberfest!


Hello!  I created this card for the Lawn Fawn Blog Challenge #182 - Sightseeing.  The challenge was to create a project inspired by a place I would like to visit.  I would love to go to so many places in Europe that it was hard to choose just one but I think Oktoberfest would be really fun.

For the background of this card, I used Salty Ocean Distress Oxide along with the Skinny Stripes Stencil.  I spattered a little watered down white acrylic paint over the entire background.  

I used the Quilted Backdrop for the tablecloth.  I left all the little bits in because I thought it would look better that way.  

I cut a piece of Blue Jay Cardstock at 5" x 5" to make  a nice little frame for my inked background.  I don't usually make cards this size, but I definitely needed the room for this card. 


For the lettering, I used Henry's ABC's to cut them out of Sunflower and Barn Red Cardstock.  I glued the red letters on top of the yellow just leaving a sliver of the yellow showing.  I like how that adds a little dimension to the lettering.  

The basket is cut from Light Brown Woodgrain Cardstock using the Build A Barrel: Apple. I also used the Dark Brown Woodgrain Cardstock for the accent.  I touched up the edges of the basket with a little Vintage Photo Distress Oxide Ink.  I cut the pumpkins from Fake Tan and Canned Pumpkin cardstock using the Stitched Pumpkins Dies.  The stems are cut from Algae Cardstock.  I added a little Barn Door Distress Oxide Ink to the edges of the pumpkins and some Rustic Wilderness Distress Oxide Ink to the stems.  

The little heart cookies are cut from Paper Bag Cardstock using the heart dies from the Watering Can and the Flippin Awesome die sets.  I touched the edges with Vintage Photo Distress Oxide and then added some little dots using my white gel pen.

I used the Build A Drink Root Beer Add on for the beer mug.  I used pearlescent vellum for the outside of the mug.  Since vellum and glue don't play well together, I applied a wide double sided adhesive tape to the vellum and then cut it out - this way I don't have to worry about glue spots showing and it will adhere to the card nicely. I used the same technique for the bubbles on the top of the mug.   The inside of the mug was cut from Sunflower Cardstock.  I used a little Fossilized Amber Distress Oxide Ink to add a little depth to the beer.  

Now for the fun part - the mice!  I used mice from Apple-solutely Awesome and Berry Special stamp and die sets.  I chose them because they had overalls on, which was a close as I could get to lederhosen.  The gigantic "brat" is from the Lets BBQ stamp set - it is a little be large but he is pretty hungry.  I did a little masking so I could keep the fort and brat together.  The glass that the other little guy is holding is also from Apple-solutely Awesome.  


I hope you enjoyed following along with the process.  This was a really fun card to make.  

Thanks for stopping by and I hope you are having an amazing fall!


Sandy


Monday, October 14, 2024

Ghouls Just Wanna Have Fun!


Hello!  Today a have some of my favorite ghoul friends for this card.  I combined three of the digital designs for the bottom of the card.  The four digital files that I used for this card are:

  • ·       Coffee Lover Ghost
  • ·       Pumpkin Ghost
  • ·       Popcorn Bliss Ghost
  • ·       Brooming By

I did reduce each of the files so that I could fit them all on the card.  I like digital files because you have the ability to make them fit the card which isn’t always the case when using stamps. 

This build the background, I inked some white cardstock with Distress Oxide Ink in Squeezed Lemonade, Mustard Seed and Carved Pumpkin for the moon.  The rest of the sky was inked with Twisted Citron, Broken China and Peacock Feathers.

To add to the scene, I used the A-2 Tree Frame from Trinity Stamps.  I cut it out of purple cardstock and then touched up the edges with Villainous Potion and Black Soot Distress Oxide Ink.    


I colored the ghosts with Copic markers in the following colors:

  • B000
  • C1, C4, C6
  • YR02, YR04, YR07
  • R20
  • Y02
  • YR23, YR27, YR24
  • V04, V06, V09
  • E31, E35, E37

 The sentiment is from the Boo stamp from Waffle Flower.  I heat embossed them with black embossing ink. 

 This was such a fun card to make.  It reminds me of my Ghoul Squad.  How about you?

 Thanks for reading and I hope you have a great day!

 Sandy


Life Is Brew-tiful With You!


Who wouldn’t love to have a cup of coffee with this cute little ghost?  I know I would.

I really wanted to use Lawn Fawn's Coffee Cup Gift Card Holder die as the backdrop on this card, but in order to do that, I had to reduce the ghost to about 1.5”.  When I printed the ghost, I also printed the sentiment that I had typed for the cup sleeve. 

I used a printed paper for the coffee cup and the background.  The sleeve and lid are cut from a cardstock that I got years ago that has a mottled gray color.  I wish I could find more of it, but all I remember is that I bought it at Michaels.

I used Salty Ocean Distress Oxide Ink to touch up the edges of the cup, sleeve and lid. 


For the coloring on the leaves, I used Distress Oxide Ink in different fall colors.  I used a small stiff brush to stipple and blend the colors on the mottled cardstock.  I used the leaves from Lawn Fawn’s Fall Leaves Backdrop die to cut the leaves out.  I arranged them as the base of the cup and then put my little coffee friend on top, 

Since I had shrunk down the ghost so much, there wasn’t a lot to color.  I used Copic markers for the coloring though. 

Sometimes I worry that my colors are too bright, so this was an attempt at doing something with more subtle colors.  

Thanks for reading the process of making this card.  I hope you have a great day!

Sandy


Sunday, October 6, 2024

Little Christmas Tree


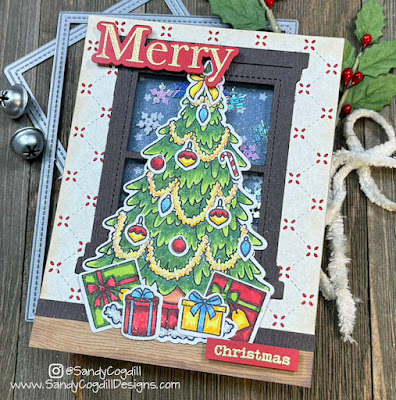
Hello my card making friends!  I have another card using the Simon Says Stamp Stamptember collaboration with Trinity Stamps.  The idea behind this card were the Christmas Trees that I grew up with.  We had a huge picture window in our living room and every year, the tree would be set up right in front of that window.  It was always artificial, but it changed over the years.  The first one that I remember was a Aluminum tree with two color wheels.  Then for awhile it was a traditional green tree but when they came out with colored trees, my mom had a white tree for a number of years.  My Christmas tree used to be centered in my living room window until our fur baby, Quincy, came along.  Looking out the front window is one of his favorite things to do.  It was either relocate the tree elsewhere or risk it being knocked over by a dog.  

In order to give depth to the window, I decided that a shaker card would do the trick.  The "wallpaper" on the front of the card was created by using the Lawn Fawn die called Quilted Backdrop.  I used a 3/4" piece of woodgrain cardstock for the floor topped with a 1/4" piece of dark brown woodgrain cardstock.    For the window, I cut it out of dark brown woodgrain cardstock using the Lawn Fawn Window Frame Die.  I added a touch of Vintage Photo Distress Oxide on the outside edge to soften the edges. 


I used a patterned paper for the backing of the shaker element.  I wanted to add a little shimmer to it, so I spritzed it with a little bit of Tim Holtz Frozen Fog Mica Spray.  I added a small piece of white glittered cardstock to create the snowy ground.  In retrospect, I didn't need to add a snowy ground because the tree is so full, it covers it up.  


I used a double layer of foam tape to create at well for the shaker elements.  I had some snowflake sequins in my stash but I couldn't tell you where they came from.  Once I had those sprinkled in, I placed a piece of clear acetate on top.  With that step completed, I adhered the front background piece on top. 


The tree and packages were colored with Copic markers in the following colors:

  • G12, G14, G07
  • Y02, Y04, Y17
  • R14, R24, R39
  • B12, B23, B24
I used Trinity Stamps Simply Sentimental: Merry stamp set and coordinating die, for the sentiment.  It was heat embossed with gold embossing powder on red cardstock.  

I really enjoyed making this card as it reminded me of my childhood.  Thank you for stopping by today and I hope you have an awesome day!

Sandy