Wednesday, November 20, 2024

Felt Candy Cane Card


Hello cardmaking friends.  I stitched up another felt candy cane for this card.  This is a fairly quick and fun stitch that makes such a great card front without a lot of extra embellishments.  There is a whole new collection of these felt dies from Spellbinders created by Nichol Spohr.  

I stitched this candy cane with one layer of felt and a piece of cardstock cut out with the same die.  It can be stitched with two background layers of felt, but I didn't want it too chunky for my card, especially with the holly leaves and berries.  

I have stitched a couple of these with both 100% Wool and a Wool Blend.  I would definitely recommend the 100% Wool, as does Nichol Spohr.  The blend doesn't seem to cut as cleanly and it doesn't hold up as well to the stitching.  I purchase my felt from Benzi Design.  They have a great color selection of felt and they also let you know what DMC floss matches.  I really appreciate that because I am all about "matchy, matchy".  The colors I used are Garnet, Ecru, Sherwood and Pinot.  

For the background on this card, I layered a green piece of cardstock with a piece of Honey Bee - North Pole patterned paper.  I also used a lighter color of brown cardstock cut with Lawn Fawn's Large Stitched Rounded Rectangle Stackables.  I used the Honey Bee Wood Planks 3-D embossing folder to add a little dimension and add to the rustic look I was going for.  I also spritzed it with the new Tim Holtz Distress Spritz in Vintage Photo.  

For the sentiment, I used Lawn Fawns, Happy, Happy Happy Add On.  The "Merry" was heat embossed with gold embossing powder.  

I am crazy about this card and can't wait to send it out.  I hope you have found some inspiration from this post.

Thanks for stopping by and I hope you are having a great Holiday Season.  

Sandy


Friend link to Benzi Design:  

https://i.refs.cc/BcHwH2QI?smile_ref=eyJzbWlsZV9zb3VyY2UiOiJzbWlsZV91aSIsInNtaWxlX21lZGl1bSI6IiIsInNtaWxlX2NhbXBhaWduIjoicmVmZXJyYWxfcHJvZ3JhbSIsInNtaWxlX2N1c3RvbWVyX2lkIjoyNTA1ODI1ODc3fQ%3D%3D


Sunday, November 17, 2024

Gift A Cup Of Coffee


Hello!  Today I took a break from Christmas cards and colors.  Well, I actually wanted this to be a Christmas card but I wasn't feeling it.  Sometimes that just happens.  

For this card, I started with patterned paper from Lawn Fawn's Watercolor Wishes, Spiffy Speckles and Pint Size Patterns: Summertime.  I touched up the edges of the cuts with Distress Oxide Ink in Worn Lipstick, Broken China, Fossilized Amber and Rustic Wilderness.

I wanted to make a Coffee Shop out of the Coffee Cup Gift Card Holder Die.  The awning on the shop is from Ta-Da! Diorama Shop Add On.  The door is from Build A Castle.  For the little windows, I used the rectangle piece from the Woodland Critter Huggers Winter Add On.  The fence is the Little Farm Fence Border Die.

The stamp sets that I used are: Treat Cart and Treat Cart Add On: Coffee.  All the images were colored with Copic markers in the following colors:

  • RV10, RV11
  • YR20, YR21, YR23, YR24, YR27
  • E13, E15
  • B91, B93
  • E31, E33, E53
  • BG10, BG70
  • W0, W2, W3


The sentiment is a combination of wording from both stamp sets.  I heat embossed them using black embossing powder.  

This turned out to be a fun afternoon project and definitely a card I will use in the future.

Thanks for stopping by and I hope you have a great day.  

Sandy


Friday, November 15, 2024

Rockin' Around The Christmas Cheese!


 Greetings crafty friends!  I hope you are well!  Today I have a card I created for the current Lawn Fawn Blog Challenge:  #184 - Holiday Inspiration.  The challenge was to use the photo below for inspiration.  I always struggle a bit when there are color suggestions.  Not sure if I got it or not.


I hadn't had a chance to use their new Cheesy Christmas Stamp and Die set, so I thought I would break it out and see what I could do with it. I also used the Cheesy Christmas Add On and Crazy Antics stamps for additional images.   

As usual, I inked my background using Pine Needles, Uncharted Mariner and Speckled Egg Distress Oxide Ink.  Once I liked the blending, I spritzed it with a little water and the speckled it with some watered down white acrylic paint to add snow.  

I wanted a snow globe in my scene since music was part of the Cheesy Christmas theme.  I used the Build A Snow Globe Die to make my snow globe.  I didn't add any little sparkles in the snow globe to make it a shaker because I felt like it would take away for the scene inside.  I still like it because it has the dimension of the globe with the acetate window,  


All the coloring was done with Copic markers in the following colors:

  • B000
  • R20, R21, R22
  • R24, R29, R39
  • E50, E51, E53, E55, E57
  • Y15, Y21, YR24, Y26
I used All The Speech Bubbles stamp and die set to create my speech bubbles using the sentiments that were included with the stamp sets.  The sentiment on the snow globe was heat embossed using white embossing powder.

This card turned out so cute with the little "punny" sentiments.  I know just the right person for the card.

Thanks for stopping by and I hope that you have an amazing day!!!

Sandy


Monday, November 11, 2024

A Very Vintage Christmas Card


 Hello friends!  I love kitschy looking Christmas from the late 40's and 50's.  There is something about it that just speaks to me.  Maybe its that my Grandma and Mom decorated the house with things they had saved over the years - I don't know!  What I do know is when I see paper that has that style or vibe, I am all over it.  

The paper for this card is from Simple Stories.  The collection is Simple Vintage Holly Jolly.  I used paper from the 6 x 8 Paper Pad and pieces from Bits & Pieces and Sentiment Bits Packs.  I did add a little bit of Stickles on Santa's Beard to replicate the glittery cards from the past.

What inspired me to make this card was the new Spellbinders - Felt Stitch & Create Collection Dies: Candy Cane by Nichol Spohr.  This candy cane made from felt reminds me of the little ornaments we would stitch using felt, sequins and beads.  

The first candy cane I made, I used two layers of felt and while that would be perfect for many cards, I felt like it would be to heavy for this card.  In order to stitch just one layer of felt, I really needed some type of stabilizer so my stitches were regular and neat.  I was also concerned about my felt puckering.  The solution I came up with was to die cut a piece of cardstock.  


I laid a piece of felt on top of the cardstock and then laid on the red felt stripes.  I started stitching the red stripes first using red floss.  I went completely around each red piece and tied it off at each one.  Nicole Spohr has great informative tutorials on her YouTube channel to neat stitching.  I could have done a traditional backstitch since the back of my candy cane wouldn't be seen, but I went with Nicole's stitching suggestions.  I would high recommend gently poking out the little dots before you start stitching, it help you line up the layers perfectly.  I stitched the leaves and the holly the same way.  In order to stay with the nostalgic vibe, I added sequins and beads to the center of the holly berries.


Assembly:  I glued the candy cane to the card background.  I used hot glue to add the leaves, holly and tinsel also.  The sentiment and Santa were popped up with some foam squares.  

Spellbinders has come out with a number of different Felt Stitch & Create Dies.  I am really looking forward to doing more projects with them.  I think I am going to do a gingerbread man next!

Thanks for stopping by today and I hope you have a great day!!!


Wednesday, November 6, 2024

Frosty Family


Hello friends!
  It’s Sandy @SandyCogdillDesigns and I am so excited to share my first card on the Scrapbook Pal Design Team with you today. How fun are these friends with their plaid flannel hats and scarves?   I think that even snowmen like to be cozy. 

Today I have a card featuring Lawn Fawn's Frosty Family and Frosty Family Add On Stamps and Dies.  Instead of stamping and coloring the little snowman accessories, I decided to use Lawn Fawn’s My Favorite Flannel Petite Paper Pack printed paper the snowmen’s hats and scarves instead of stamping and coloring them.  I used Copic markers to add just a little shading to give them dimension.  I also used the blue from Lawn Fawn’s Spiffier Speckles Petite Paper Pad, since it coordinates so well to finish building my scene. 

To start out, I used Lawn Fawn’s Spooky Forest Backdrop to cut out my border from the blue plaid paper.  I wanted a little dimension on my card, so I cut three additional backdrops from white cardstock.  I will glue all of these together to created a nice frame for the inside of the scene.  I do this technique often, especially if I am creating a shaker card.  I feel like it gives the card a nice finish.


Next, I cut a small piece of pearlescent vellum using the Simple Stitched Hillside Border to create a ground for my snow family to stand on.  I attached the vellum to the side of my newly created “frame” making sure that I keep the glue away from anyplace the vellum would be seen.  Glue and vellum don’t play well together.

I stamped the hats and scarves on plaid paper and then used the coordination dies to cut them out.  I used Copic markers in G94 and R56 to do a little shading to add some dimension to the pieces.  


Once I have my snow people stamped, I place the little accessories where I will glue them later, so that I know where I want to stamp their little faces and his buttons.  I find this is the best way to make sure that they are neither too high nor too low once the hats and scarves are applied. 


I colored the Frosty Family and Frosty Family Add On using Copic markers in the fallowing colors:

Once they are colored and cut out, I will adhere them to the center of the card making sure I add their little arms.  


For the sentiment, I used Lawn Fawn's Henry’s Build A Sentiment:Winter.  I stamped them on white cardstock and then trimmed them close to the lettering and then placed the trimmed sentiment on a scrap piece of plaid paper.  I trimmed the plaid paper about 1/8” from the white cardstock.  I adhered them to the upper and lower corner of the card.  I also added the “Merry Christmas” sentiment to the inside of the card.  I really like this stamp set because there are tons of ways to combine the words to create just the right sentiment for your card. 

Once I got to this point on the card, I felt like it needed a little something, so I used the two extra snowflakes from Lawn Fawn’s Snow Flurries Backdrop.  I used the plaids from the same collection.

I really like the cozy feel of this card.  I hope you have found a little inspiration from this design.  Thank you so much for taking time from you day to visit the blog.  I hope you have an amazing day!

Sandy

Tuesday, November 5, 2024

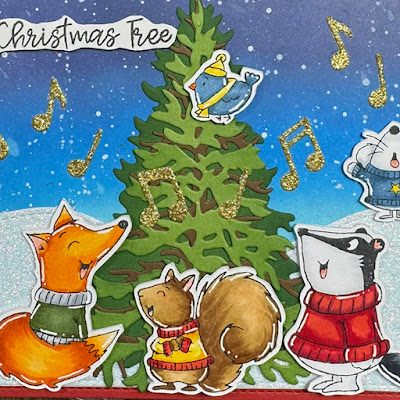
Caroling Woodland Creatures


Who wouldn't want to sing along with this fun crew?  This is a new stamp set by Gerda Steiner Designs.  She always has such cute little friends to create with.

For the background on this card, I ink blended Chipped Sapphire, Salty Ocean and Tumbled Glass Distress Oxide.  I spritzed it with some water to add some dimension.  I also watered down some white  acrylic paint to speckle it to make some snowflakes.

Even though there is a tree in the stamp set, I wanted to have a larger one.  I used Spellbinders Simon Hurley's Classic Christmas Tree.  I didn't put any ornament on it because I didn't want to take a way from the music notes.  

I cut the notes from gold cardstock using Lawn Fawn's Little Music Notes.  The snowy ground is cut from Pixie Dust cardstock using Lawn Fawn's Stitched Hillside Border.  

The Carolers are colored with Copic Markers in the following colors:

  • E53, E55, E57 - SQUIRREL
  • YR15, YR21, YR18 - FOX
  • C00, C1, C6, C9 - RACCOON
  • C00, C0, C2 - MOUSE
  • R39, R29, R24 - REDS
  • Y13, Y15, YR23 YELLOWS
  • B95, B97, B99 - BLUES
  • G94, G99 - GREENS
The sentiment is from the Caroling Woodland Creatures stamp set.

I think my favorite creature is the little mouse - he must be a soloist.  

Thanks for stopping by today and I hope you have a great day!!!

Sandy


Beary Merry Christmas!


Hello!  I finally had a chance to play with Gerda Steiner's new Beary Merry Christmas stamp set.  What can I say about this guy?  Well .... he is down right festive in his Christmas sweater and antlers.

For the background on this card, I used an Ski Lodge embossing folder from Spellbinders.  It was just perfect for this card.  The snowflakes are cut from gold glitter cardstock.  The dies were a freebie from Trinity Stamps last holiday season.  

My little friend was colored using Copic markers in the following colors:

  • E53, E55, E57, E59 - BEAR
  • E50, E51, E53 - DEER AND ANTLERS
  • R20, R22
  • TR23, Y17, Y15, Y17
  • R39, R29, R24
  • C4, C6
I used the sentiment from Trinity Stamps Freezin Family  stamp set.  

He sure was fun to color and I am looking forward to using him in the future.  💖💖

Thanks for stopping by and I hope you are having a great day!

Sandy


SnGNOMEman


Hello!  I can't seem to stay away from these cute Gnomes by Trinity Stamps.  I have used a couple of the other Gnomes from this set on another card, but really wanted to color in the SnoGNOMEman with the bucket on his head.  Isn't he just the cutest?????  I'm also loving the igloo.  

For the background, I ink blended Chipped Sapphire, Salty Ocean and Tumbled Glass Distress Oxide Ink.  I spritzed it with a little bit of water to create a little dimension.  

I really wanted to use the A-2 Tree Frame die and I wanted it cut from a Pixie Dust cardstock.  However, once I had it cut out, I didn't like how harsh the edges looked.  I had my blending brushes out from doing the background, so I thought I would see what the cardstock looked like if I hit the edges with a little distress ink and I really liked it.  I used Salty Ocean Distress Oxide Ink.  I also cut a second piece of cardstock to create a little hill for my skier.  I also hit those edges with a little ink.  The picture doesn't really show how frosty it looks.  

All of the coloring is done with Copic markers in the following colors:

  • YR01, YR02, YR07
  • Y00, Y04, Y08
  • YG01, YG03, YG07, G09
  • B000, B01, B12, B16
  • BV0000, BV000, BV01, BV04
  • E31, E33, E35
  • C1, C2, C4, C5, C6

This was the first time I used a blue-violet for coloring snow and I really liked the way it turned out so I am sure I will be using it in the future.  

For the sentiment, I used the Simply Sentimental Merry and the Simply Sentimental Christmas.  I stamped and cut the words from white cardstock.  I colored the inside of the letters and the outside white edge with Copic markers to tie it into the scene.  

Once I had put everything together, I felt like I needed a little something in the upper right hand corner.  I had some little snowflakes I had cut out for another card in the same Pixie Dust cardstock, so I put them in the upper corner.  Perfect!!

This is such a fun card and I wish that my pictures could capture the sparkle!  Thank you so much for stopping by today and I hope that you have been inspired to make a snGNOME scene of your own.

Sandy


Monday, November 4, 2024

We Whisk You A Merry Christmas


Hello!  Now that Halloween is in the books, it's time for the mice to get started on their holiday baking.  

I have always loved the Sprinkled With Joy stamp set and dies by Lawn Fawn.  Their A Creature Was Stirring also works so well with it.  A couple of the mice are from Sweet Christmas Mice, which was a "freebie" during the Fall 2024 release.  

I wanted the mice to be standing on cookbooks in order to reach the top of the oven, so I used the Book Collection die set.  The little books on the shelf are from the Stitched Bookmarks die set.  

The sentiment was placed on the spines of the books using the sentiment from A Creature Was Stirring.  The "titles" on the little books on the shelf are from the Treat Cart Add On: Coffee.   The shelf is from the Purrfectly Wicked stamp set.  


All the images were colored with Copic Markers in the following colors:

  • RV11, RV14, RV29
  • BG11, BG32, BG34
  • E31, E33, E35,
  • E23, E25, E27- Shelf
  • E30, E31 – Cookie Dough
  • YR21, YR24, YR27 - Gingerbread
  • C0, C1, C2, C3, C4
  • R20, R21
For the background, I used a sheet of patterned paper from the Candy Cane Lane Petite Paper Pack.  The floor is cut from light brown woodgrain cardstock.

This is such a fun card and would be perfect for the baker in you life!

Thanks for stopping by and I hope you have an amazing day!!!

Sandy