Thursday, March 27, 2025

Hope You Feel Better Souper Soon!


 Hello!  I am just loving the new Trinity Stamps new Soup Can Card Die and stamp set.  I have made a couple of pill bottles using the included dies, but decided to do an Alphabet Soup shaker card.

I couldn't find the right colored paper for the background in the soup can and I even didn't like the Distress Oxide Ink colors that I had, so I used my Copic Airbrush System to color my white cardstock.  I used R08, and YR07.  Those two colors felt soupy enough.  


For the front panel of the card, I cut a piece patterned paper with a die that is 4.25" x 5.5".  I then used the piece of the die that is the "inside" of the can.  

I adhered a piece of acetate, 4.0" x 5.0 to the back of the patterned paper to make my window.  Next, I used the two dies that are the "inside" of the can with a piece of cardstock to create a frame to make the can shape more defined.  I adhered the little frame piece on the front of the card, resting on the acetate in the opening.  


I cut the can lid and bottom pieces using a matte silver metallic cardstock.  Once I had the three pieces glued together to crate the lid, I adhered it to the top of the front panel and adhered the bottom can rim a the bottom of the window opening.  


I stamped the included sentiments on the piece of the die that make a label.  I heat embossed it on patterned paper using black embossing powder.  I couldn't fit the "soon" on the label, so I stamped it on the larges of the circle dies in the Souper set and then trimmed it with a coordinating patterned  paper using a die from the Clean Cut Layers Circle Die: Set A.  I adhered those in place on the top of the front panel.  


I created a well with foam tape on the back panel to have a place to put my alphabet noodles and some orange and red sparkle spots.  My alphabets noodles were cut from cream cardstock and the Banner Builder Die Set.  Once I had those placed, I peeled the protective tape off the top of the strips and place my front panel on top.  


I love the way this card turned out and I really like that I have a Get Well card already made and ready to send.

Thank you for stopping by the blog today, and I hope you stay well and have a great day!!!

Sandy


Get Better Soon Sunshine


 Hello friends. Today I have a fun card using the new Trinity Stamps Soup Can Card Die Set, Healing Wishes stamp collection and the Wildflower Garden stamp and die set. 

The background for the pill bottle was created by stenciling clouds using Tumbled Glass Distress Oxide Ink.  Once I had that inked and splattered with some watered down ink, I used the inner die from the Souper Die Set to cut it out. 

Next, I stamped the Wildflower Garden on X-press It Blending Card and colored it in with the following Copic marker colors:

  •        V01, V12, V15
  •         Y11, Y15, Y15
  •        YR15, YR18, YR21
  •         E23, E42, E57
  •         YG61, G43
  •         G12, YG45, YG67
  •         R91, R83, RV34

I used the coordinating die set to cut out the flowers and the butterflies.  I placed that on the cloudy background piece and determined not only where I wanted the sentiment to go, but where I wanted to place the die to cut it so that it would line up on my background piece.  Once that is cut, I will adhere it to the cloud piece.

I wanted to add a little dimension to the pill lid, so I placed it on a sticky mat and added a little Hickory Smoke Distress Oxide Ink.

The card base was cut with the die and then folded on the embossed line to create the card.  I adhered the colored piece to that and then added the lid making sure that it was centered on the card.  While I tend to use liquid glue for most things, I did use adhesive tape to place the bottom of the bottle on the card to help me place the lid so everything was nicely centered.

I think this turned out to be a really sweet little Get Well card.  I really like that it is an actual shape which adds to the uniqueness of it. 

Thank you for stopping by today.  I hope you have been inspired to create your own card.

Sandy


Wishing You A Speedy Recovery


 Hello friends!  Today I have a really cute Get Well shaker card.  I really like the new Trinity Stamps Soup Can Card Die set.  This set comes with the option of making a card that looks like a soup can or a pill bottle.  I chose to use the pieces included in the die to make a pill bottle. 

To start, I cut a piece of patterned paper to 4.25” by 5.5”.  I used the piece of the die that would create the body of the bottle to cut an opening in the paper. 


Using the same die piece, I cut another piece of patterned paper but I used the inside of the cut to create the bottle part. I adhered that to a piece of white cardstock cut at 4.35” x 5.5” using the patterned paper that I first cut to line up the bottle on the cardstock which will be the backing of the shaker card. 


Next, I will use a double layer of foam tape to create a well to place the shaker elements.  I used silver and red sparkle dots and the Happy Pills Clay Embellishment Mix. 


 I cut a piece of acetate at 4” by 5” to cover the bottle opening on the front patterned piece of paper. I also created a little bottle “frame” using the two die piece that come with the set.  I think it nicely finishes the outside edges of the bottle.  Once I have those glued together, I will close up the card.

To finish up the card, I used the Healing Wishes stamp set to stamp the sentiment on a piece of cardstock that was cut using the label die from the set.  I added a little Salvaged Patina Distress Oxide Ink to the edges to give them a little dimension.

I used the pill dies that also come with the Souper Die Set to cut out a few capsules and tablet out of white cardstock.  I used Copic markers to add shading and colors that compliment the rest of the card.  The colors that I used are:

  •  Y04, Y13, Y15
  •    R14, R27
  •     B000
  •     BG45, BG53

I also added some cute little faces to my pills to tie the card together.

After I had the card completely assembled, I thought that I might have been neat to put some dimensional glaze on the pills but wasn’t going to try to attempt it and destroy the card.  Hmm…maybe next time. 

This card just cracks me up and I hope it puts a smile on your face also. 

Thank you for stopping by and I hope you have a great day!!!

Sandy


Monday, March 24, 2025

You Are s-BLEND-id


 Hello!  Today I have a really fun and colorful shaker card using my favorite mice and the new Lawn Fawn Build A Blender die.  I had a lot of fun with all the bright colors on this card.

In order to fit everything on this card, I made it 5.25" x 5.25".  I didn't have cardstock or patterned paper as bright as I was wanting it, so I used my Copic Air Brush System to created my own using all different colors to achieve the colors I was looking for.  I really like to do this because there is such a pretty subtle shine on the paper when you are done.  

Stamps:

  • You Autumn Know
  • Henry Junior's ABC's
Dies:  
  • Henry's ABC's
  • Build A Blender
  • Build A Drink
  • Build A Drink Cocktail Add On
  • Build A Drink Mason Jar Add On
Stencil:
  • Tropical Leaves Stencil
This card just puts a smile on my face!  

Thanks for stopping by and I hope you have a s-blend-id day!!!

Sandy

Wednesday, March 19, 2025

Terrific Tulips


 Hello!  I am up on the Scrapbook Pal blog today with this card.   The official day of Spring in only one day away, how exciting is that?  There is no better way to celebrate than to give a bouquet of those beautiful tulips that will be popping up soon.  However, we don't have to wait because we can make our own.

The background of the card is an off white piece of cardstock cut to 4" x 5.25" with Lawn Fawn's Outside In Stitched Rectangles. I ran it through my die cut machine using the Altenew Masonry Wall 3-D. To add a little bit more texture and interest, I touched up the edges with Antique Linen Distress Oxide Ink and then spritzed it with Antique Linen Distress Spritz.  I placed it on a teal colored piece of cardstock that was cut to 4.25" x 5.5" using the Lawn Fawn Large Stitched Rectangle die.


The bouquet wrap is cut from a thin burlap using the Lawn Fawn Flower Bouquet Wrap.  I gently touched up the edges of the wrap using Vintage Photo Distress Oxide Ink.  I cut the stems and leaves from a medium green cardstock using the Lawn Fawn Terrific Tulips die.  I touched up those edges with a little Rustic Wilderness Distress Oxide Ink.  


The petals of the tulips are cut from a light yellow cardstock.  To give them a variegated appearance, I inked Festive Berries Distress Oxide Ink concentrating the color at the bottom and then drawing it up to the top of the petal.  Once those were dry, I attached the stems but left the leaves off.  


Once I have the tulips placed in the warp, I will go back and add the leaves where they seem fit. Using a piece of hemp twine.  


To finish up the card, I will adhere the bouquet along with the sentiment banner using Bearly Art Precision Craft Glue.  The sentiment is stamped using Henry's Build A Sentiment: Spring stamp set using Memento Tuxedo Black Ink and then cut out with Lawn Fawn's Everyday Sentiment Banners.  To "plus it up", I added a few little pearls from Honey Bee Stamps North Pole Pearl Stickers.  

Thanks for stopping by and I hope you have found a little inspiration from this card. Happy Spring!


Sandy


Tuesday, March 18, 2025

Tail Waggers


 Hello!  Today I have a couple more dog themed cards.  I really like the new Honey Bee Stamps Pet-Tastic collection.  It is is a nice collection of all kinds of pets - even a hamster.  You might want to check it out.

I made the background paper using a technique that I learned from Carrie Rhoades, @carrierhoades, on a Live YouTube for Trinity Stamps.  She made a really cool dinosaur background paper for a tri-fold card.  If you would like to check it out, here's the link - Double Window Trifold Card.  I also have a YouTube video that shows the process, only it was for a couple of different cards.  The link for that video is - Honey Bee Stamps Lovely Layers Large Dogs.

I used the Trinity Stamps Emergency Card Essentials Die, to cut the background paper along with the other decorative elements.  The Corgi and the Bulldog, are stamps from the Honey Bee Stamps Tail Waggers stamp collection.  I stamped the images with Uncharted Mariner Distress Oxide Ink.


The sentiment is stamped and die cut from the Honey Bee Stamps Pet-tastic stamp set.  

These are a couple of really quick cards to make, especially when you use the Emergency Essential Die Set #1.  

Thanks for stopping by!

Sandy

Monday, March 17, 2025

Love Is A Four Legged Word


 Hi there cardmaking friends!  Today I have a couple of cards that I created with some of the new goodies from Honey Bee Stamps new Pet-Tastic collection.  When I was growing up, we always had little lap dogs but the guy I married had two big Chow-Chows and ever since Pogo and Pepper, we have always had big boys.

The backgrounds for these cards were created with new technique that I learned from watching a Live YouTube that Carrie Rhoades, @carrierhoades.  She made the cutest tri-fold card with background paper she created with small dies and Simon Hurley Stamping Foam.  Here is the link if you want to take a peek at her creation - it is super cute.  Double Window Tri-Fold Card - Trinity Stamps.

When I saw the Pet Friends dies from Honey Bee I knew right away that I was going to give it a try.  To start off, I took a piece of chipboard cut at 4.5" x 5.75" and placed strips of double sided adhesive strips across one side of the board.  Then I adhered the individual dies from the Pet Friends die set randomly over the board.  

Next, I used my heat tool to warm up the surface of the stamping foam and then chipboard, die side down, on the foam and firmly pressed it.  It should leave a nice imprint of the dies when the chipboard is removed.  

I rubbed Distress Oxide Ink over the top of the foam pad and then spritzed it lightly.  I then took a piece of cardstock, cut to 5.5" x 6.0" and pressed it lightly on top of the wet pad.  For these two cards, I used Broken China and Salvaged Patina for the background colors.  I am linking the YouTube video I created at the bottom of this post if you want to watch the process.  Once the cardstock is dry, I will cut them to 4.0" x 5.25".

For the dogs, I used Honey Bee's Lovely Layers Large Dog dies to cut out different colors of scrap cardstock to create each one.  The Burmese Mountain Dog is cut from three different browns, along with a cream, black and pink.  I added Pumice Stone and Vintage Photo Distress Oxide Inks to the outside edges to create a little more definition.  I also popped the head up with some thin foam squares.

For the Yellow Lab, I used four different colors of creamy/tan cardstock.  To get the color I was looking for, I used Rusty Hinge Distress Oxide Ink.  I applied the ink along the edges and then pulled it into the body.  I did try to keep his chest a little lighter.  

I personally prefer to use liquid glue to put my dogs together.  I find that it give me time to push and wiggle the little pieces into place.  

For the sentiment on these cards, I used Honey Bee's Pet-Tastic Sentiments stamps and coordinating dies.  

Once the front panels of my cards were complete, I adhered them to a complimentary colored piece of cardstock cut to 5.5" x 4.25" and then adhered to a blank card base.  

I love the way these cards turned out and it will be nice to have them on hand to send to fellow dog lovers.

Thank you for stopping by and I hope you have an amazing day!

Sandy


Sunday, March 16, 2025

Build A Bunny by Lawn Fawn


 Oh my goodness who couldn't just love this couple?  They are so cute in their little Easter outfits.

For the background on this card, I used the Outside In Stitched Rectangle Stackables to cut a piece of Bitsy Blooms -Begonia patterned paper to 5.25" x 4.0".  I also used this die to cut a piece of Sage cardstock to use as the backing behind the the egg.  I used the Quilted Backdrop to cut a piece of Speckled Eggshell cardstock.  To cut the egg shaped opening, I used the Outside In Easter Egg Stackables.


I cut out the bunnies using the Build A Bunny die set.  I cut them from a light brown cardstock and the touched up the edges with a little Vintage Photo Distress Oxide.  The ears and noses are cut from a pink cardstock.  I shaded the pink with a little Kitsch Flamingo Distress Oxide.  The clothes are cut from patterned paper from the Bitsy Bloom Petite Pack using the Build A Bunny Accessories Add On.  

For the sentiment, I cut the "happy" from the Happy Easter Line Border.  The "Easter" is cut using the Scripty Easter and the Scripty Easter Outline Add On.  Both words were cut from gold metallic cardstock.

To finish up, I used my white gel pen to add a few highlights.

I think this card is just darling and can't wait to send it out.

Thank you for stopping by and I hope you have a great day!!

Sandy

Birthday Celebration


This is a very simple shaker card made with Lawn Fawn's new Build A Drink Blender Add On.  

The items used are all Lawn Fawn Products:

  • Build A Drink: Blender Add On
  • Build A Drink: Cocktail Add On
  • Build A Drink
  • Sunrise Backdrop
  • Henry's Build A Sentiment: Spring
A perfect card for a Birthday Celebration!

Thanks for stopping by!

Sandy

Dino-mite Birthday Card


Hello!  This card is very similar to a shaker card that I made using the same two dinosaurs from Trinity Stamps T-riffic stamp and die sets.  This is actually the card I had initially envisioned, but was having a devil of a time getting it to work the way I wanted it to.  So, after that brontosaurus roamed around in my head a few days, I finally figured out how to make it work.  I am linking my YouTube video showing how I made this card at the bottom of this post.

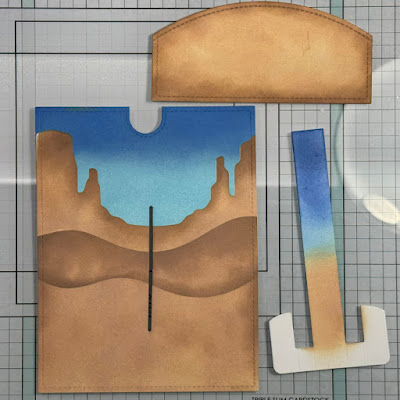
For the background, I cut a piece of cardstock 4.25" x 5.5".  To be able to make the brontosaurus move up and down, I used the Let's Toast Pull Tab Add On from Lawn Fawn.  To place the slit that the dinosaur moves up and down in, I measured in 2 and 1/8th" in from the long edge and 1 and 1/8th" up from the bottom and drew a light pencil line 2" long.  Using the die from the set I cut it twice lining it up along the pencil line.  I cut the notch with the included die from the set, lining it up with the top edge of the background.  

Using the Desert Canyon Backdrop by Lawn Fawn, as a stencil.  I inked the background using Prized Ribbon and Tumbled Glass Distress Oxide Ink for the sky and Tea Dye and Vintage Photo for the ground.  I also used the Lawn Fawn Hillside Stencil to lay in a couple more hills.  

To create the hill that hides the dinosaur when he is positioned at the bottom of the card, I cut another piece of cardstock 4.25" x 5.5". I measured up 1" from the bottom on both sides and placed the Lawn Fawn Hillside Border at the marks to cut the hill.  Once that was cut, I used Tea Dye and Vintage Photo Distress Oxide Ink to ink blend the hill to match the background.  

I also inked the piece from the Pull Tab set that slides up and down so that it would blend in and not be too noticeable when the Brontosaurus is at the bottom of the card.  

Once I had that done, I was ready to assemble the mechanism.  


I folded the arm mechanism at the fold lines on the bottom of the "double J" piece.  I inserted the two folded pieces through the slit from the back side.  I glued the arm brace on the back under the notch to hold it in place.  

The Dino's are stamped and cut using the dies from the Trinity Stamps T-riffic set and were colored with Copic Markers in the following colors:
  • R17, R27, R39 - Hearts
  • YR20, YR21, YR23, YR24, YR27 - Triceratops 
  • YG61, YG63, G21, G24 - Brontosaurus
I will glue the Brontosaurus to the arm and the Triceratops to the front of the card where I heat embossed  the sentiment.  The sentiment is from the Partysaurus Stamp and Die Set.  

To assemble the card, I placed 1/4" double sided foam tape along the outside of the hill piece making sure to the leave the top edge without tape so the Brontosaurus will move up and down freely.  I will place 1/2" double sided tape along the outside of the background that has the moving dinosaur.  I adhered the background layer to another piece of cardstock cut 4.25" x 5.5" making sure the arm moves up and down freely. Then, I adhered the hillside piece to the front of the background layer covering all of the Brontosaurus except the balloons.  


I assemble some palm trees from Lawn Fawn's Hammock and Trees die and glued them on the sides of the card.  

To add a little more interest to the sky, I used Lawn Fawn's Puffy Cloud Frame Die to cut a couple of clouds to glue on.  

There are a lot of steps to this card, so I would definitely recommend watching the YouTube video for better instruction and detail.

Thank you so much for stopping by today and I hope you have an amazing day!!!

Sandy


Sunday, March 9, 2025

Happy Easter!


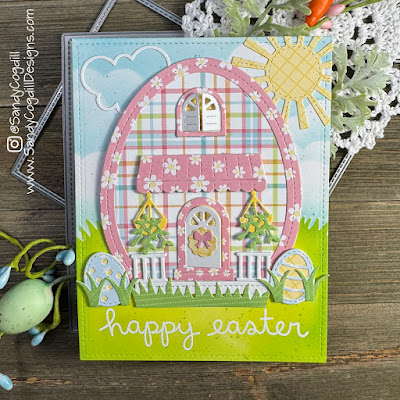
Who do you think lives in this adorable house?  I definitely have patterned paper hoarding issues, so I really have to force myself to use it.  However, I did let the patterned paper do all the work on this card.  

The background is inked with Distress Oxide Inks in Tumbled Glass, Twisted Citron and Mowed Lawn.  I used Lawn Fawn's Cloudy Sky and Grassy Hillside Stencils.  


The dies that I used are: 

  • Outside In Easter Egg
  • Easter Egg Frame
  • Build A House: Christmas Add On - Door, Wreath, Bow
  • Build A House - Awning
  • Build A House: Spring Add On - Window
  • Build A House: Beach Add On - Porch and Rail
  • Build A Greenhouse - Hanging Plants
  • Build A Basket: Easter - Small Eggs and Grass
  • Spring Showers - Sun
  • Puffy Cloud Frames - Cloud
The sentiment is from the stamp collection: Celebrations Scripty Sentiments.

The outside of this house is so cute, I would love to see what is inside.

Thanks for stopping by!

Sandy

Hope Your Birthday is Rawrsome!


Hello!  A fellow cardmaker, Helene Siermans Petterson, @nicksscrapshack, and I started chatting about all the places these little mice would explore and we decided to make a Jurassic Park themed card.  Hers turned out adorable of course, https://www.instagram.com/p/DG-eVnJgAgr/?img_index=1.  This is my take!

I decided on a slimline card because there were so many little things that I wanted to put on it.  I cut the background from white cardstock using Lawn Fawn's Large Slimline with Sliders die.  I inked the sky by lightly inking the area with Tumbled Glass Distress Oxide Ink and then went back with Prize Ribbon Distress Oxide using the Slimline Cloudy Stencil.  

For my little volcanos, I used the Stitched Mountain Border to cut my range out of Ground Coffee cardstock.  I cut the little snow tops from Pumpkin cardstock and applied them to the mountains.  To turn the mountains into volcanos, I cut the top of the mountain off and then rounded the edges.  To give the background a little more interest, I used the Slimline Picket Fence die with white cardstock, the Slimline Stitched Hillside Borders with Paper Bag cardstock, and Slimline Grassy Hillside Border with Algae cardstock.  To give my card a little more dimension, I cut another layer of Algae cardstock with the Slimline Grassy Hillside Border and popped it up with some foam tape.  I added a couple of clouds using white cardstock and the Puffy Cloud Frame die.  


The stamps sets that I used are, It's A Bird, Rawrsome, and Critters In The Desert.  They were colored with Copic markers in the following colors:

  • E30, E31, E35, E37, R20, R21, R22 - Mice
  • G21, G43, YG63 - Brontosaurus
  • Y26, YR23, YR24 - Triceratops
  • YR12, YR15, YR18, Y35 - Stegosaurus
  • YG93, G94, G99 - Cactus

For the sentiment, I used the one included with the Rawrsome stamp set.  I heat embossed it using black and white embossing powder.  

This was definitely a fun little challenge.  I can only imagine where these little guys to travel to next.

Thanks so much for stopping by today!

Sandy


Saturday, March 8, 2025

Beet, Carrot Lime.....Bum! Bum! Bum!


Hi again!  This card was just for fun.  We had a wedding last year, and everyone had so much fun singing along to Neil Diamond's, Sweet Caroline, that I thought that I would make a card.  Of course it had to be "punny" so I used a few Lawn Fawn dies and lettering.

Supplies:

  • Stitched Root Veggies
  • Zesty Lemon
  • Scalloped Slimline with Hearts
  • Claire's ABC's
That song get stuck in my head every time I look at the card.  So Good! So Good!

Sandy

Monday, March 3, 2025

We Miss You Already!


Hello!  I am back today with my new little favorite friends from Lawn Fawn.  This It's A Bird stamp and die set is so versatile - I can see these little guys traveling all over.

For the background, I cut a piece of cardstock 4.25" x 5.5". Using the Desert Canyon Backdrop by Lawn Fawn, as a stencil.  I inked the background using Prized Ribbon and Tumbled Glass Distress Oxide Ink for the sky and Tea Dye and Vintage Photo for the ground.  I also used the Lawn Fawn Hillside Stencil to lay in a couple more hills.  I made a card with a similar background and have a YouTube video showing the process if you want to watch.  https://studio.youtube.com/video/nf4uUjB1uy4/edit.

I also cut a couple more layers for the bottom of the card for my sentiment and friends using the Stitched Hillside Border die.  I inked and blended it with the Tea Dye and Vintage Photo Distress Oxide Ink.  I also completed the sentiment by heat embossing it using Harold's ABC's.  

I cut the "We Miss You" from Barn Red and #2 Pencil cardstock using Finley's ABC's.  I like to layer my die cut letters to add a little dimension to them.  I adhered them to the background along with a couple of clouds using the Simple Puffy Cloud Frame die.  

The images from It's A Bird and Critters In The Desert are colored with the following Copic colors:

  • G21, YG63, G94
  • E35, E37
  • R17, R35, R39
  • Y11, Y15
  • R20, R21, R22
  • E40, E41, E42, E43
  • C0, C1, C3
I think this is just such a cute card because of the little mice.  

Thank you for stopping by today and I hope you have a great day!!!

Sandy