Hello! This card is very similar to a shaker card that I made using the same two dinosaurs from Trinity Stamps T-riffic stamp and die sets. This is actually the card I had initially envisioned, but was having a devil of a time getting it to work the way I wanted it to. So, after that brontosaurus roamed around in my head a few days, I finally figured out how to make it work. I am linking my YouTube video showing how I made this card at the bottom of this post.
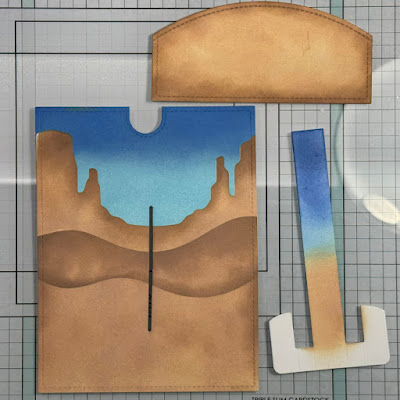
For the background, I cut a piece of cardstock 4.25" x 5.5". To be able to make the brontosaurus move up and down, I used the Let's Toast Pull Tab Add On from Lawn Fawn. To place the slit that the dinosaur moves up and down in, I measured in 2 and 1/8th" in from the long edge and 1 and 1/8th" up from the bottom and drew a light pencil line 2" long. Using the die from the set I cut it twice lining it up along the pencil line. I cut the notch with the included die from the set, lining it up with the top edge of the background.
Using the Desert Canyon Backdrop by Lawn Fawn, as a stencil. I inked the background using Prized Ribbon and Tumbled Glass Distress Oxide Ink for the sky and Tea Dye and Vintage Photo for the ground. I also used the Lawn Fawn Hillside Stencil to lay in a couple more hills.
To create the hill that hides the dinosaur when he is positioned at the bottom of the card, I cut another piece of cardstock 4.25" x 5.5". I measured up 1" from the bottom on both sides and placed the Lawn Fawn Hillside Border at the marks to cut the hill. Once that was cut, I used Tea Dye and Vintage Photo Distress Oxide Ink to ink blend the hill to match the background.
I also inked the piece from the Pull Tab set that slides up and down so that it would blend in and not be too noticeable when the Brontosaurus is at the bottom of the card.
Once I had that done, I was ready to assemble the mechanism.
- R17, R27, R39 - Hearts
- YR20, YR21, YR23, YR24, YR27 - Triceratops
- YG61, YG63, G21, G24 - Brontosaurus
I assemble some palm trees from Lawn Fawn's Hammock and Trees die and glued them on the sides of the card.


No comments:
Post a Comment